Tag: pantry staples

  • Homemade Bread for Busy Moms: Easy Stand Mixer Loaf

    Homemade Bread for Busy Moms: Easy Stand Mixer Loaf

    Homemade Bread Recipe: Easy Stand Mixer Loaf for Busy Moms

    Nothing beats the smell, warmth, and flavor of freshly baked bread—the perfect side for any dinner. Baking bread at home doesn’t require fancy equipment, just a bowl, measuring spoons, a stand mixer (or strong arms), a loaf pan, and a few pantry staples: flour, yeast, water, salt, and sugar.

    Proofing Yeast (5-Minute Magic)

    I start by proofing the yeast: 1¼ cups of warm water go into my stand mixer bowl with 1 tablespoon of sugar, then I sprinkle in 1 tablespoon of active dry yeast. I gently stir with a fork and wait. After about five minutes, the surface foams with that sweet, earthy yeast smell—like bread meets beer. At that point, I know the yeast is alive and ready.

    Mixing the Easiest Bread Dough

    In a separate bowl, I whisk together 3½ cups of bread flour and 1 teaspoon of salt until evenly mixed, feeling that familiar powdery texture between my fingers. I pour the foamy yeast mixture into the dry ingredients and start mixing with the dough hook on my stand mixer.

    Soon, it comes together into a sticky shaggy dough—not pretty yet, but exactly where it should be.

    I cover the bowl and let the dough rest (autolyse) for about 20 minutes. This lets the flour hydrate and makes the dough much easier to work with. When I uncover it, the transformation begins—shaggy mess to elastic dough ball. It still amazes me every time.

    Kneading + First Rise (Therapy Time)

    The kneading process is fun to watch. At first, the dough resists, but as the mixer works (or your hands knead), it slowly becomes smooth and supple, yielding to pressure and then springing back. After about 8–10 minutes of kneading, it’s ready for the first rise.

    I leave the dough in the bowl, cover it, and let it rise for about an hour, until it has doubled in size.

    While I wait, I prep my loaf pan with a thin layer of lard and flour for a natural nonstick surface—no special sprays or chemical coatings needed.

    Shaping + Final Rise (Roasting Pan Hack)

    After the first rise, I gently deflate the dough and turn it out onto a lightly floured surface. To shape the loaf, I stretch the top surface to create tension, pinch the bottom seam together, and roll it into a tight cylinder until I’m happy with the shape.

    Then I place the shaped loaf into the prepared loaf pan. Here’s my busy mom hack: I set that loaf pan inside a medium-size roasting pan with a lid. I cover the roasting pan and let the dough rise again until it just crests above the edge of the loaf pan. This setup creates a Dutch-oven-style environment without needing to preheat a heavy Dutch oven.

    Baking Perfect Bread Crumb

    While the dough finishes its second rise, I preheat the oven to 425°F.

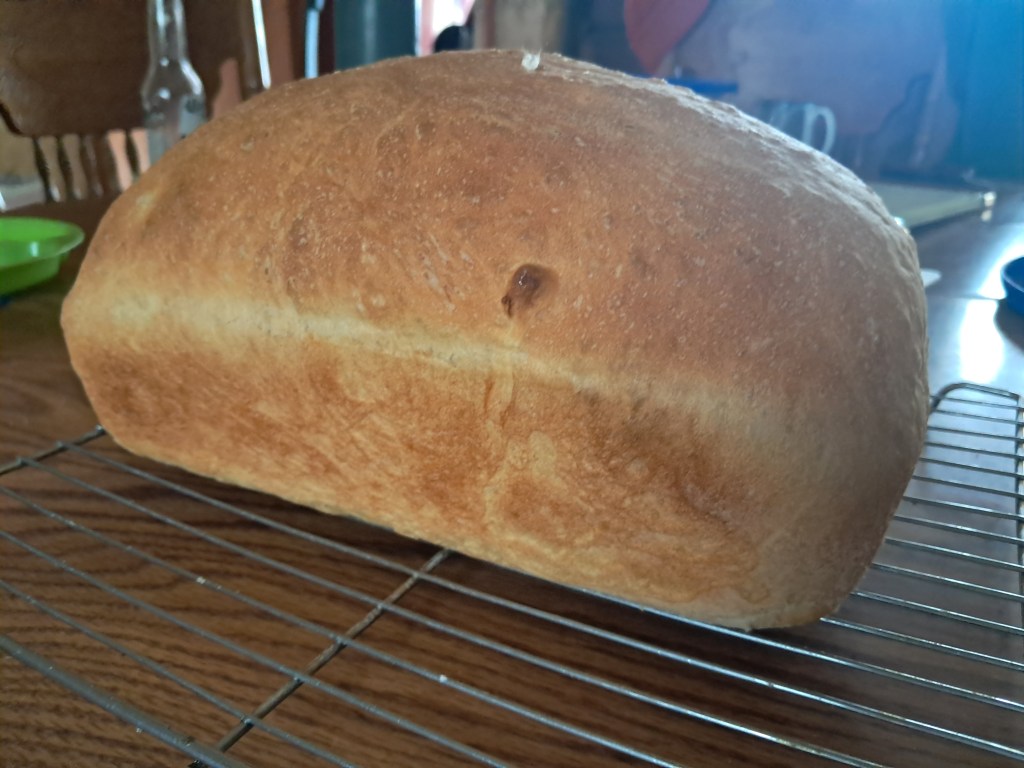
    When the oven is ready, I slide the covered roasting pan (with the loaf pan inside) into the oven. The lid traps steam and helps the bread rise beautifully. I bake it covered for 25 minutes, then carefully remove the lid and bake for another 10 minutes, until the top is deeply golden.

    The kitchen fills with that irresistible fresh bread aroma. Through the oven window, I watch the crust caramelize as the steam inside gives the loaf that gorgeous oven spring.

    Cutting Fresh Bread (Patience Test)

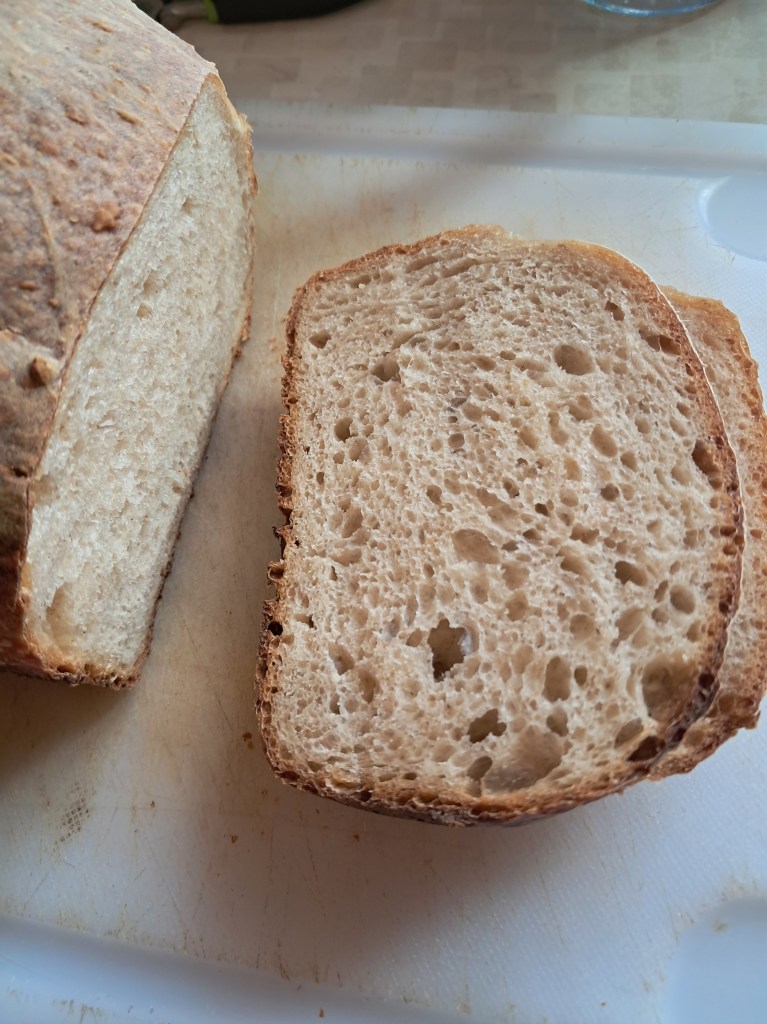
    This is the hardest part: waiting. I resist cutting the bread right away. The crust crackles softly as it cools, and I take that as my signal. Cutting too soon can squish the loaf and collapse the airy interior.

    Once it’s cooled just enough, I slice into the loaf with a bread knife. Steam rushes out, and I see a soft, well-aerated crumb—those lovely little holes all the way through. A pat of butter melts on contact. Crunchy crust meets soft, tender interior. Simple, homestead perfection.


    What’s your favorite way to eat fresh bread? As a dinner side, French toast, toast with jam?
    ❤️ Like if you can almost smell it through the screen.
    📲 Share with a busy friend who’s always wanted to try baking bread.
    💬 Comment your go-to topping: butter, honey, jam, or all of the above?

  • My Top 5 Essential Grocery Staples for Homesteading and Scratch Cooking

    My Top 5 Essential Grocery Staples for Homesteading and Scratch Cooking

    List your top 5 grocery store items.

    Disclosure: This post contains affiliate links. As an Amazon Associate, I earn from qualifying purchases. Thanks for supporting Practical Homesteading!


    If you walked down a typical grocery store aisle with me, you might think I’m lost. While most American shoppers reach for convenience, I’m the one squinting at sacks of flour, jars of yeast, and tubs of coconut oil — the same staples my great-grandmother probably chose 75 years ago. I don’t shop for ready-made meals; I shop for possibility.

    At home, those bulk ingredients become whatever we need — bread, tortillas, sauces, or even snacks. If I don’t know how to make something, I learn. A simple search and a quiet evening in the kitchen have taught me more than any cookbook could. This hands-on, old-fashioned approach has saved us thousands over the years, but more importantly, it’s built confidence, patience, and gratitude for every meal we share.

    Now, that doesn’t mean I don’t enjoy Chinese takeout once in a while! I’ve learned to make my own dumpling and stir-fry recipes — they’re delicious when they turn out, and hilarious when they don’t. (One of my most epic flops was a lemon pepper chicken so salty it could’ve been used as a salt lick.) Mistakes keep me humble, and in a way, they’re the best ingredient for growth.

    Homemade potato chips
    Bloody Mary with mostly homegrown ingredients

    So with gratitude — and a dash of humility — here are my five most essential grocery items and how they shape my kitchen life on the homestead.


    5. Coconut Oil

    Coconut oil (affiliate link) is my go-to multipurpose fat. It melts like butter and works wonders in place of lard or shortening. I use it to pop popcorn, bake desserts, and even blend it into homemade flour tortillas.

    Its aroma — faintly sweet and buttery — adds a subtle depth you can’t quite place but always appreciate.

    Tip: For tender baked goods, replace half the butter or shortening in your recipe with coconut oil, then reduce liquid slightly. It gives just enough chew without the greasy feel.


    4. Active Dry Yeast

    Yeast (affiliate link) is the quiet hero of my kitchen — small, simple, and full of potential. Watching dough rise never loses its magic, especially when the kitchen smells of warm, sweet yeast and anticipation.

    It symbolizes self-reliance: turning flour, water, and salt into something living, breathing, and nourishing.

    Tip: Always proof yeast with a pinch of sugar in warm water (around 110°F). If it bubbles within 10 minutes, your dough is ready to rise.


    3. Chicken and Beef Bouillon Powder

    I lean on chicken (affiliate link) and beef (affiliate link) bouillon powders for soups, gravies, and especially rice. Cooking rice in chicken or beef stock instead of water transforms it from plain to crave-worthy.

    I also mix beef bouillon into my homemade onion soup powder — it adds warmth and richness that store mixes can’t match.

    Tip: Swap half the water for stock when cooking noodles, grains, or vegetables. It’s the fastest way to round out flavor without extra sauces or salt.


    2. Plain White Sugar

    Plain old white sugar earns a spot near the top because it does so much more than sweeten desserts. It wakes up yeast, balances tomato acidity, and — lately — fuels our lemonade habit.

    My sister keeps me well-supplied with lemons, so I make fresh lemonade weekly. When the kids come in sun-dusted and thirsty, that chilled pitcher waiting in the fridge makes them light up.

    Tip: Add a teaspoon of sugar to tomato sauces or soups to tame acidity without losing depth of flavor.


    1. Flour

    If coconut oil is the heart of my pantry, flour is its backbone. I buy high-gluten flour for breadmaking (affiliate link), but I’m excited to experiment more with ancient grains soon.

    The feel of dough under my hands, the smell of a fresh loaf cooling on the counter, and the crackle as it’s sliced — it’s the rhythm that grounds my kitchen.

    Flour builds loaves, tortillas, focaccia, and even desserts. It’s humble, forgiving, and powerful — no one in my house has ever once complained about home-baked anything.


    We rarely buy vegetables from the store, relying instead on what we’ve grown and preserved — jars of tomatoes, beans, and pickles lining the pantry. They remind me that what we grow in summer sustains us long after the frost sets in.

    Our winter meals center around potatoes, onions, and frozen vegetables like broccoli and bell peppers. We’ve experimented with extending our garden season using a small greenhouse and straw. There’s something deeply satisfying about pulling greens or a carrot from a garden while snow still glitters outside.

    As for meat, we’re still building toward full independence. We raise our own pork, purchase beef from my sister’s grass-fed herd, and still buy chicken from the store — for now. One day soon, meat birds will join the homestead lineup, and the circle will feel more complete.

    Each grocery item on this list earns its place not for novelty but for versatility. They remind me that eating well doesn’t require endless ingredients — just a few solid building blocks and the creativity to make them shine.

    This slower, more deliberate approach to cooking has taught me creativity, patience, and gratitude — lessons that spill over into every other area of life.

    Homesteading has shown me that ingredients matter less than the care and love you pour into them. Every loaf, jar, and meal built from raw goods feels like an act of heritage — and hope — in a world that moves too fast.

    Homestead maple syrup

    What five grocery staples would make your list? Please share them in the comments. And if this post inspired you, please likeshare, or subscribe to follow more homesteading stories, seasonal recipes, and simple living tips.

    Related Posts

    The Choreography of Cattle and Grass

    Experience a vivid farm story about rotational grazing, resilience, and regenerative land stewardship through the eyes of a family and their Red Angus herd. Discover how cattle, people, and pasture move together in balance

    Keep reading