Right now, our days overflow with three big works. I’m writing this when I’m 36 years old. I hope you’re looking back on this time fondly, with a loving husband, two beautiful young children, and a growing homestead and writing hobby that is starting to bear some fruit.
Raising Emotionally Intelligent Kids
I’m working hard to help my children grow into emotionally intelligent, successful people who can easily integrate into society. I’m working internally on myself before I radiate love out to them. All while making sure they pick up their socks and eat their dinner. Will my work be worth it, and will they look back on their childhood fondly?
Building Our Homestead
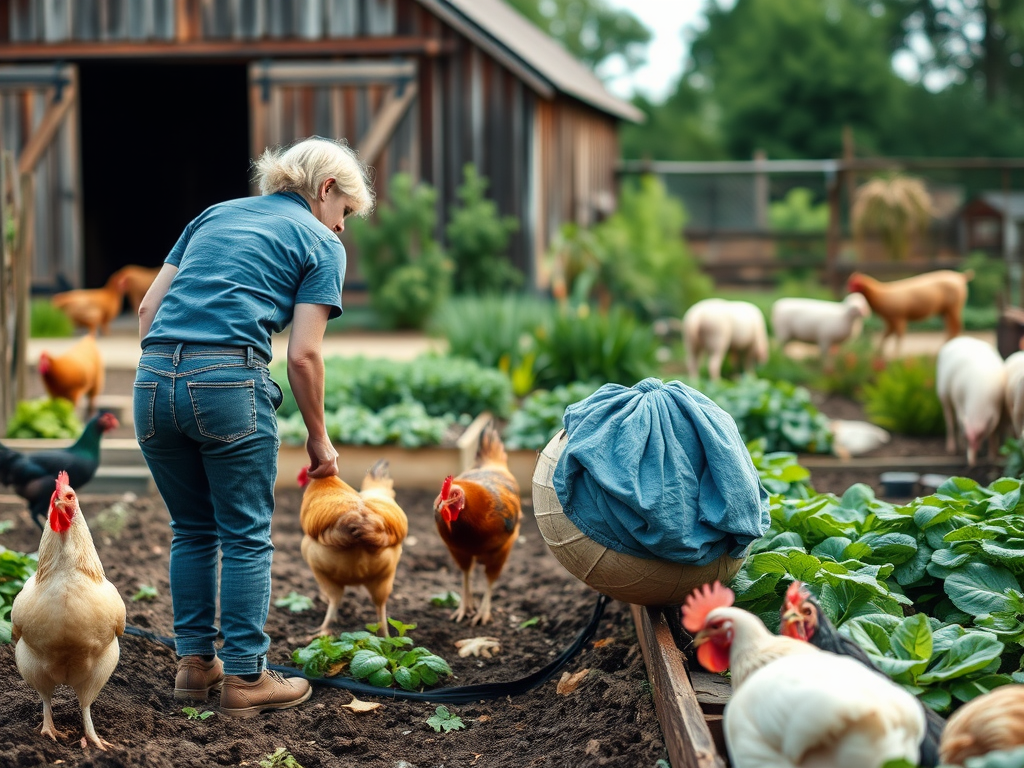
My husband and I are also working on building our homestead. Last year, I learned how to grow mushrooms (the logs are colonized!), and this year we’re learning how to farrow pigs (first litter due Mother’s Day). Things don’t always go smoothly, but every homestead lesson learned is one that we can apply to the next set of skills. Will we continue to build and expand our homestead?
Growing My Writing Community
I’m also working hard on a writing hobby. Ever since I was a little girl, I loved to write. My first short story was about a herd of cows that escaped and exacted revenge on their owner (I was 8, and I grew up on a farm). And now I’m sharing homestead stories about my family and my hobbies. And people are listening and writing back! It is amazing to find kindred spirits out in the world. I hope we meet in person someday. Will I become a successful writer and continue building this community?
I hate the question “What do you do for a living?” because it shrinks a whole person into one job title. A single answer can’t capture the messy, beautiful layers of real life.
Why It Feels Reducing
People ask it as small talk icebreaker—easy, automatic. But I’ve learned the hard way that life isn’t defined by work. Take me: yes, I’m an environmental professional by trade. That’s just my 9-to-5, and I’m very passionate about what I do.
The rest of me lives as a writer spinning homestead stories, a homesteader pulling winter carrots from frozen soil, a mom wrangling morning meltdowns, and a caretaker tending clucking chickens, strutting turkeys, and pigs rooting through the mud (who will hopefully farrow for the first time around Mother’s Day).
These homesteading roles shape me equally—maybe more. The question pretends otherwise.
Who It Leaves Out
Worse, it sidelines anyone without “traditional employment.” Stay-at-home parents, caregivers, homesteaders, creators between gigs—they get frozen out. Conversation stalls: “Oh, nothing?” as if their days lack value.
I’ve watched friends flush, stammer, or deflect. Motherhood is full-time labor. Homesteading demands innovation daily. Caretaking livestock like pigs and chickens builds worlds from scratch. Why does a paystub trump that?
Better Questions Exist
When cornered, I say: “I protect land by day, grow food and stories by life.” But I’d rather flip it: “What lights you up outside work?” That uncovers the human underneath.
People are mosaics, not labels. Next time you’re tempted, ask about passions instead.
Practical Homesteading: growing food, raising kids, building community.
What’s YOUR most-hated question? Share below! 🔥 I bet we can rewrite the script together!
If this resonates, like + share so other multi-role makers feel seen! 💕 Tag someone stuck in job-box conversations.
Loved this? Subscribe for more homestead/mom reflections:
Before I started, I thought homesteading would mean endless chores and calloused hands. Instead, I’ve discovered these quiet joys that keep me hooked on this life.
1. Dry toast mornings that actually work Recently, I started my 6-year-old son’s day by hugging him for two minutes (and telling him how great it was to see him) instead of rushing him. He ate his plain toast (despite us asking three times if he wanted butter or peanut butter—little monster), and we got to school early enough for playground time. Who knew starting slow could make us faster?
2. Winter carrots tasting like candy Pulled bright orange carrots from frozen ground under snow and straw this past February. The deep cold turns their starches to sugars—they’re sweeter than anything from the store. I’m eating them in a pot roast dinner tonight. Proof that nature knows best.
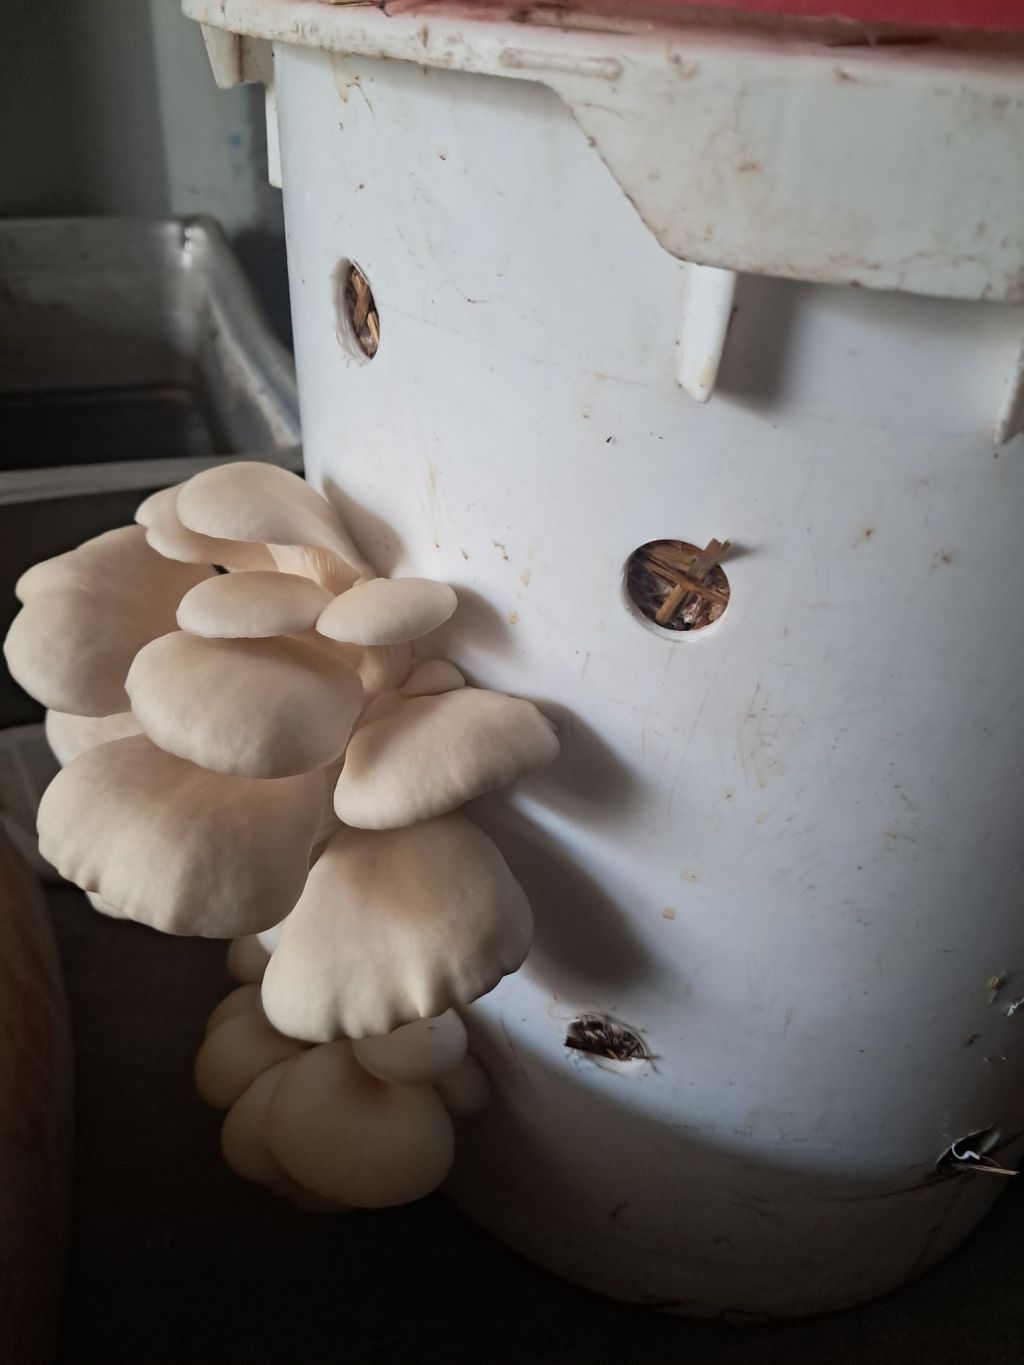
3. The taste of fresh mushrooms is incomparable I’ve successfully grown oyster mushrooms in a straw substrate, and they are delicious—so much tastier than the button mushrooms you get at the store (and those are good). I started shiitakes last year too, but they haven’t fruited yet (hoping they will this spring).
4. Kids eating garden “weeds” they hate from stores My children turn up their noses at store kale but devour it fresh from our beds. They pull radishes straight from soil and munch like apples. Familiar dirt makes everything taste better.
5. Fresh air fixing my mood instantly Ten minutes outside—picking beans, checking chickens, or just sitting—resets my whole nervous system. No therapy session beats weeding when anxiety creeps in. It’s free medicine growing right in my yard.
6. Writing turning chaos into clarity Hospital stays, morning meltdowns, scar shame—scribbling it all down transforms tangle into meaning. What starts as venting becomes connection when I hit “publish.” This blog is my compost pile for hard emotions.
7. Self-care mornings making me patient A quick workout and solid sleep before the kids wake up changes everything. Instead of snapping at heavy feelings, I can breathe through dysregulation and model it for my kids. The mom who shows up calm handles chaos ten times better.
8. Crockpot smells everyone loves Even in my college dorm, that slow cooker made my floor smell like home. Now it draws my family to the kitchen hours before dinner’s ready. Simple food, big magic.
9. Small wins building big confidence One perfect carrot harvest, one peaceful school drop-off, one good paragraph—they stack up. Each success whispers, “You can do hard things.” Homesteading proves I’m tougher than I think.
10. Coming home to my roots wiser The girl who couldn’t wait to escape Dodge County returned at 33—not out of failure, but choice. I’ve circled back to gardening, animals, community with new eyes. Leaving helped me love it more.
Practical Homesteading: growing food, raising kids, building community.
What’s your unexpected love in this lifestyle? Share below—I’d love to hear!
Loved these homesteading surprises? ❤️ Tap the heart, share with your farm friend, or tell me your unexpected joy below. Your support grows this community!
Loved this? Subscribe for more homestead reflections:
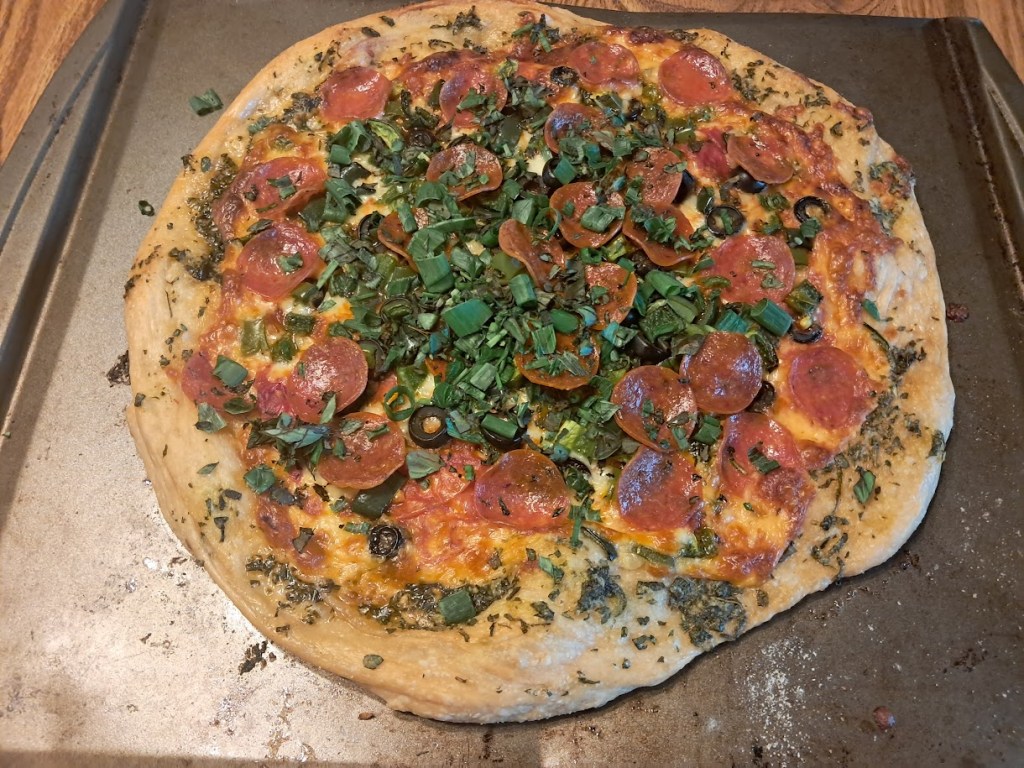
A cooking disaster in my freshman dorm set me up for homesteading success I never expected. One apparent failure became the foundation for kitchen confidence.
Freshman Year Pizza Disaster
My first “from-scratch” pizza took three times longer than delivery. The crust was a brick, sauce too acidic, toppings slid everywhere. My future husband politely choked it down. Mortifying.
That flop taught me two things: failure stings less when shared, and every kitchen mistake teaches something concrete. I started measuring flour properly, tasting as I went. Zucchini bread followed (once ruined by tablespoons of salt instead of teaspoons—inedible).
Homesteading Kitchen Payoff
Fast forward to our rural homestead. Now I confidently make:
Pizza dough my kids beg for weekly
Sourdough from wild yeast I captured
Crockpot meals filling our home with irresistible smells
Garden sauces from our own tomatoes
A couple of weeks ago, I pulled winter carrots (candy-sweet from the freeze) for pot roast. No one would guess this calm came from serving weaponized pizza.
Failure’s Gift: Iteration Over Perfection
Cooking disasters built my homesteading confidence through kitchen iteration:
Honestly, the three objects I couldn’t live without are surprisingly ordinary: my cell phone, my wallet, and my keys. As a working mother in a rural area, they’re not glamorous. But they quietly hold my daily life together, from parenting to work to community.
My Cell Phone: Brain in My Pocket
My cell phone is how I stay organized and connected as a working mom. It holds my calendar, reminders, notes, and grocery lists—the invisible scaffolding keeping family life and work from falling apart. It’s how I juggle meetings from home, text my husband about pickup times, message teachers, and look up last-minute recipes when dinner planning slips my mind.
Living rural, it’s also my lifeline. If the car breaks down, a kid gets sick, or something unexpected happens, that little rectangle becomes my map, flashlight, and emergency contact list all in one.
My Wallet: Quiet Security for Daily Life
My wallet isn’t exciting, but it represents security and flexibility for a busy mom. It holds my ID, bank card, maybe a little cash, insurance cards, and a few too many crumpled receipts—the boring but essential pieces of adulthood.
I always keep my Kwik Rewards card tucked inside for that 15th visit reward. When someone suddenly needs snacks, school supplies, or a quick pharmacy run, my wallet means I can handle it without hesitation. It’s the difference between feeling stuck and responding smoothly to whatever the day throws at us.
My Keys: Rural Freedom and Independence
Because we live in a rural area, my keys are completely non-negotiable. They’re my way to get everywhere: school drop-offs, work meetings, grocery runs, appointments, visits with family and friends. No corner store walk or public transit here—if I don’t have my keys, I’m not going anywhere.
They also symbolize independence as a working mother. Being able to load everyone in the car and just go—to town, the park, a friend’s house—makes rural life workable, even wonderful.
Everyday Objects That Make Rural Parenting Possible
There are plenty of sentimental objects I love, but these three form the quiet backbone of my days. Without them, the logistics of working motherhood, parenting, and building community in a rural area would get complicated fast.
Becoming a mother has been the single biggest catalyst for my personal growth.
Before kids, I was incredibly reactive—if things didn’t go exactly my way, I’d turn into a total grump and let it derail my whole day. Motherhood quickly showed me that life rarely follows a perfect schedule, and that’s been my greatest teacher.
Why Kids Test Every Limit
Kids have this amazing knack for upending even the best-laid plans. They’ll dawdle on shoes when you’re already late, take forever to eat (or skip it entirely), spill milk right after you’ve cleaned up, or melt down in the grocery store for reasons that make no sense in the moment.
It’s just kids being kids—no malice, just the beautiful chaos of childhood. Those situations used to trigger frustration in me. I’d snap or rush through, only to feel completely drained afterward.
Over time, I realized my reactions weren’t really about the spilled milk or dawdling. They came from my own exhaustion, unmet needs, and unrealistic expectations of myself and my family.
My Self-Care Mornings Changed Everything
Mornings have always been tough for my 6-year-old, who really struggles to wake up. This turns what should be a simple routine into a battle to get to school on time. But I’ve noticed a huge difference when I take care of myself first. When I prioritize a decent morning workout, solid sleep, and a general sense of calm, I allow myself to show up much more effectively for him.
This morning was a perfect example. Instead of rushing, I sat with him for a couple of minutes, just hugging him and saying hello. I told him how wonderful it is to see him first thing. From there, he headed to the kitchen, ate his dry toast (even though we asked three times what he wanted on it and he insisted on nothing… little monster, haha), and we were out the door with enough time for him to play with his friends in the classroom before the day really started.
We went from 25-minute morning battles to peaceful 15-minute exits, and it all starts with me feeling steady inside.
Tools That Actually Work for Emotional Regulation
Now, I make it a habit to tune into my body first. When I feel dysregulation creeping in—my chest tightening, voice getting sharp, jaw clenching—I pause instead of powering through. Sometimes that’s a few deep breaths at the kitchen sink, sometimes stepping into another room for a moment, or just saying out loud, “I’m feeling overwhelmed right now.”
Journaling has become another lifeline. After a tough moment, I write out what triggered me, the worries bubbling under the surface, or the guilt I’m carrying quietly. It helps me sort through it all and parent myself a little, not just my kids. And when I mess up, which I still do plenty, growth shows up in the repair—apologizing to my son, noticing what works next time, and choosing breath over snapping.
The Real Growth Isn’t Perfect—It’s Daily Practice
Motherhood grew me most because it gave me daily practice at my weakest spots: patience, self-awareness, and repair. I’m still a work in progress—there are days when I’m more grump than grace. But our mornings feel noticeably lighter now, and he sees me trying.
Growth doesn’t look dramatic or perfect; it’s in those small choices—to hug instead of hustle, listen instead of lecture, apologize instead of pretending I had it together.
What experience grew you the most? I’d love to hear your story in the comments below!
Loved this? ❤️ Tap the heart, leave a comment with your growth story, or share with a mom friend who needs this today. Your support helps this community grow!
Loved this? Subscribe for more parenting reflections:
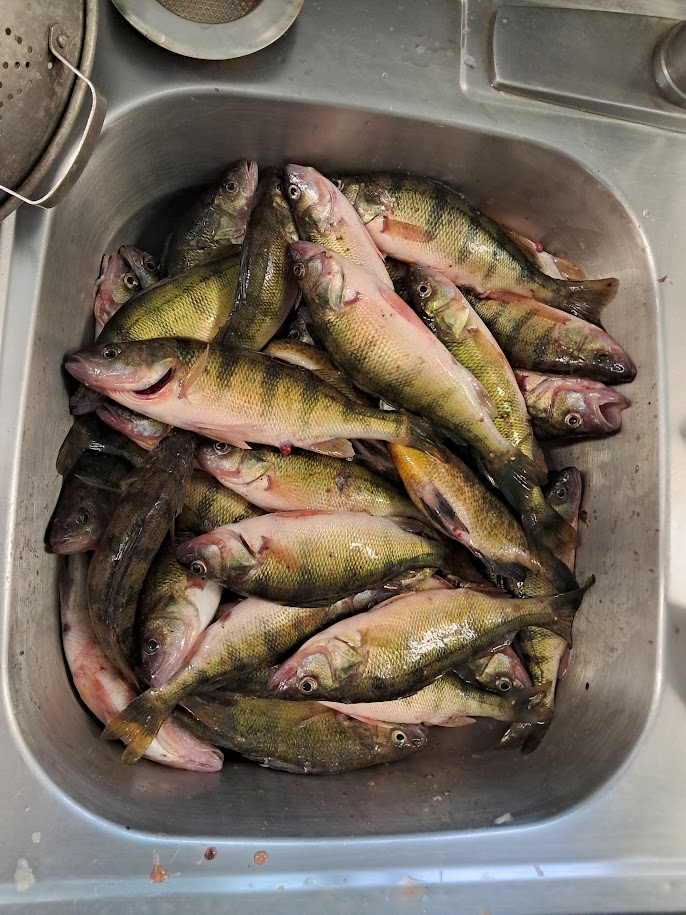
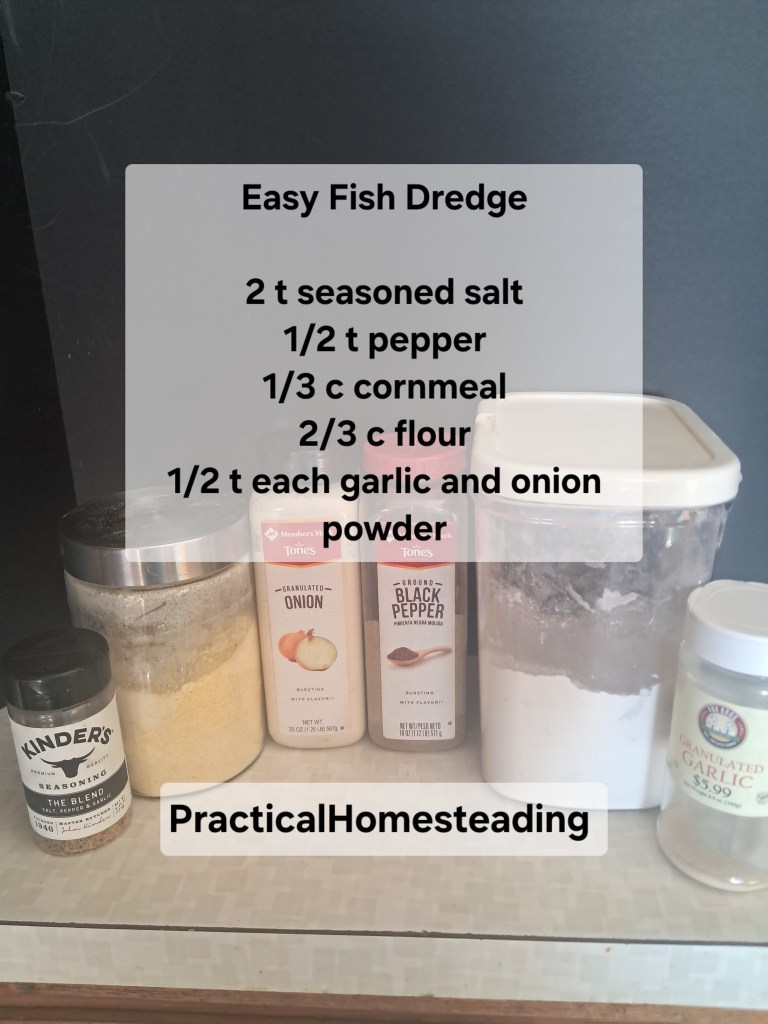
My husband’s been ice fishing more with his brother lately — and I love it.
He gets fresh air, laughter, and some friendly competition. And him coming home refreshed with rosy cheeks and a bucket of perch or bluegills (he always brags about outfishing his brother, but I never know what’s true).
Some of the perch we cook
Here’s the recipe that makes it all worthwhile — simple homestead cooking at its best:
1–1½ lbs fish fillets (perch, walleye, tilapia, or catfish)
Dredge: ⅔ cup flour, ⅓ cup cornmeal, 2 tsp seasoned salt, ½ tsp pepper, ½ tsp garlic powder, ½ tsp onion powder
¼–⅓ inch lard, tallow, or coconut oil (we use lard from our pigs)
Lemon wedges + tartar sauce for serving
Instructions
Prep fish: Cut into ⅛ inch (3mm) pieces. Drain but don’t pat dry.
Mix dredge: Whisk dry ingredients. (My years of tweaking: more cornmeal = better crunch.)
Heat skillet: Cast iron over medium-high until fat shimmers (350°F).
Fry: Dredge fish, fry 3–4 min per side until golden.
Finish: Drain on paper towels, salt while hot. Serve immediately.
Pro Tips for Crispy Fish
Thickness: 3mm pieces cook evenly, never dry.
Cornmeal magic: Creates perfect crunch.
Hot oil: Sizzles immediately = crisp exterior.
Serve with: Coleslaw + potatoes, homemade fries, or simple greens.
Why This Works for Real Families
Forgiving, fast, uses pantry staples. Whether ice fishing haul or store fillets, it delivers crispy, golden fish kids devour. Using our pig lard makes it true homestead cooking.
Your Turn to Share
Pan-fried fish in cast iron? Your dredge secrets? Ice fishing stories? Drop them in comments — and subscribe for more homestead recipes!
⭐ **Loved this recipe or ice fishing story?** Tap ❤️, drop a comment with your fish-fry tips, and share with your outdoorsy friends! Your support helps this little homestead kitchen grow. Thank you! 🐟🔥
Loved this? Subscribe for more reflections on life:
The pink line said everything I couldn’t. My husband and I were expecting our first child.
I couldn’t say I was surprised—we had been trying for a couple of months. But I was a little sad to see an era end. For the first time, I had true freedom: spontaneous road trips with friends, solo coffee dates that stretched into afternoons, disposable income that let me buy plane tickets without a second thought. We’d just bought our first homestead after driving to Alaska for our honeymoon. Life felt wide open and full of possibility.
I wasn’t sad he was coming—I was nervous about losing that independence and learning to be a mother, but equally excited to meet him, like a blind date with the love of my life. Saying goodbye to that version of me was hard.
Pregnancy: Holding Joy and Fear Together
Holding that positive test, I felt both gratitude for this wanted gift and quiet grief for what was changing. No one prepares you for motherhood’s bittersweet beginning, when you’re thrilled about the baby but apprehensive about who you’ll become.
Throughout pregnancy, my love for him grew right alongside very real nerves. I cherished feeling his first flutters—those tiny “butterflies” that made him real—and hearing the rapid whoosh-whoosh of his heartbeat at every doctor’s appointment. I talked to him constantly through my belly, telling him about the adventures we’d have someday together. Choosing his name felt perfect, like we already knew him. But I also wondered if I’d be a good mom, grieved the end of solo adventures, and felt my independence quietly slipping away as my body changed.
Labor and Those Early, Raw Days
Labor brought everything into sharp focus. When my water broke and my body started shaking, it wasn’t just the contractions—it was the weight of knowing there was no going back. Breastfeeding tested me too. Anxiety made it harder than it “should” have been. I worried constantly if he was getting enough, if I was already failing at the one thing my body was made to do.
The Small Moments That Changed Everything
Slowly, the cloud of doubt lifted—not dramatically, but through ordinary moments that felt sacred. His first sleepy smile lit something up in me, whether it was gas or not. His tiny hand gripped my finger with surprising strength. His body finally relaxed into mine when he fell asleep on my chest. That pure belly giggle when I tickled his neck cut straight through all my self-doubt.
I watched him skip crawling altogether and go straight to walking with those wobbly, determined steps. He explored the world with toddler intensity—picking up rocks, chasing bubbles, staring at ants on the sidewalk like they held all life’s secrets. His questions grew more complex over time, moving from “What’s that?” to “How does it work?” and “Why?” That curiosity pulled me back into wonder I didn’t know I’d lost.
The Adventures We Promised Each Other
Those belly conversations came back to me often—they became reality, just more locally than my pre-baby dreams. Instead of cross-country drives, we’ve explored Lake Michigan beaches together, giggling as waves lap our toes. We’ve visited the zoo, marveling at animals that fascinate him more than any faraway landmark could. Now at 6, with his 2-year-old sister tagging along, we’ve spent countless hours at parks, pushing swings and hunting for the perfect climbing tree. The adventures came true—they’re just the ones that fit our family life together.
The Trade-Off That Was Worth Every Goodbye
Life before kids offered a particular kind of freedom. Now my money goes to toddler shoes he outgrows in three months and snacks that disappear in two minutes. Late nights with faraway friends have been replaced by early mornings and sticky hands around my neck.
But I’ve gained something irreplaceable: a front-row seat to a whole human becoming himself. The “Mama?” calls from the next room. The love that shows up in the ordinary and the hard.
He was deeply wanted from that very first pink line. I was nervous about motherhood, yes. But I was thrilled to meet him. The trade-off hurt, but loving him made every goodbye worth it.
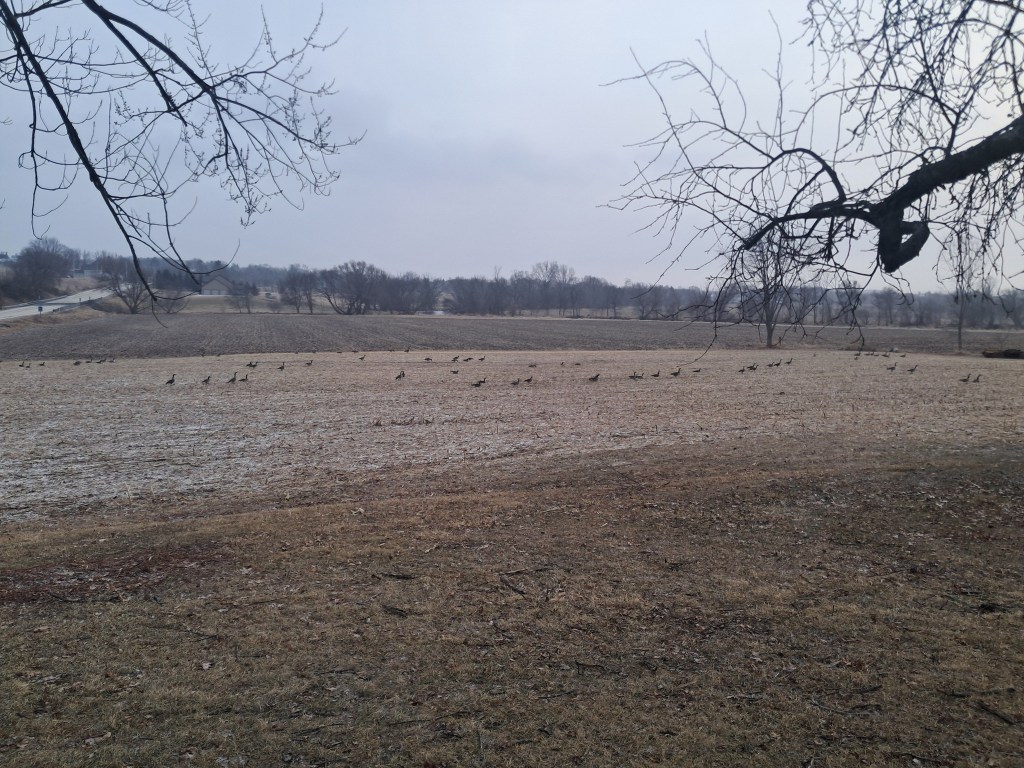
Spring is on the move! The geese are back in our corn field, snacking on the kernels we missed last fall as they make their way north. During the day they feast here, and at night they head back to the Horicon Marsh—just two miles west of us. It’s a rhythm we’ve come to count on, almost like the turning of a calendar page that only nature can read.
Early Spring Signs: From Geese to Goslings
Soon the quiet honks in the distance will give way to a full chorus overhead. As their numbers grow, they become our entertainment—chasing each other away from the best spots, flapping their wings and honking aggressively. Then they will begin to form pairs.
It won’t be long before we’re seeing those fuzzy little goslings wobbling around on unsure legs. I always smile at how they’re both awkward and perfectly at home in the world at the same time. They don’t rush their growing, they just…are. There’s a lesson in that for the rest of us, I think.
Subtle Signs of Spring You Might Miss
Around here, early signs of spring start small if you’re paying attention:
The snow melts back from the south-facing sides of buildings first, leaving little ribbons of bare ground.
Puddles form in the ruts of the driveway, full of reflected sky.
The air still has a bite to it, but every now and then, in the afternoon, there’s a softness you can feel on your cheeks. The kind of air that makes you stop and think, “Oh. It’s changing.” It’s when you know it’s time to tap the trees for maple syrup. Sap flows best at days above freezing, and nights below freezing.
The soil starts to loosen its grip, too. Boots sink a little deeper, and you can smell that rich, damp scent of earth waking up. The barn cats linger longer in patches of sun. The chickens get a bit braver, scratching farther from the coop, as if they also sense that winter’s hold is slipping.
The Magic of Longer Days
I always notice the light first. The sun sets 2 minutes later each day now, stretching out the day bit by bit. Supper dishes are ready to serve while there’s still a faint glow in the west.
That extra light brings with it a quiet invitation: to dream about the garden, to flip through seed packets, to imagine rows of green where right now there’s only brown and grey.
First Signs of Spring in Everyday Life
Spring on the homestead, in this in-between time, is easy to miss if you’re only looking for flowers and green grass. But if you look closer, it’s there in the geese in the field, the drip of melting snow, the mud on the boots piled by the door.
It shows up in the way we start talking about “when it warms up” instead of “if it ever warms up.”
What Are Your Early Signs of Spring?
What early signs of spring are showing up where you are? Maybe it’s a certain bird call you only hear this time of year, or the first brave shoots pushing up through the cold ground.
Maybe it’s kids trading snow pants for lighter jackets, or the way your houseplants suddenly seem a little happier near the windows.
What’s your first sign of spring? Drop it in the comments—we’re all watching for those first hints together! 🌱
Early signs of spring are HERE! Geese honking, sap flowing, sun lingering longer. Which first sign of spring did you notice today? LIKE + SHARE if you’re feeling that seasonal shift! 🌿
Is this a trick question? As a homesteader near the Horicon Marsh, I feel like my entire life is one big DIY project.
We grow our own food, raise our kids, and build community. Very little is pre-packaged in our life. Homesteading is being in a state of constant learning: new skills, fresh challenges, figuring things out as we go. One long series of experiments riddled with dirt, sweat, and grace.
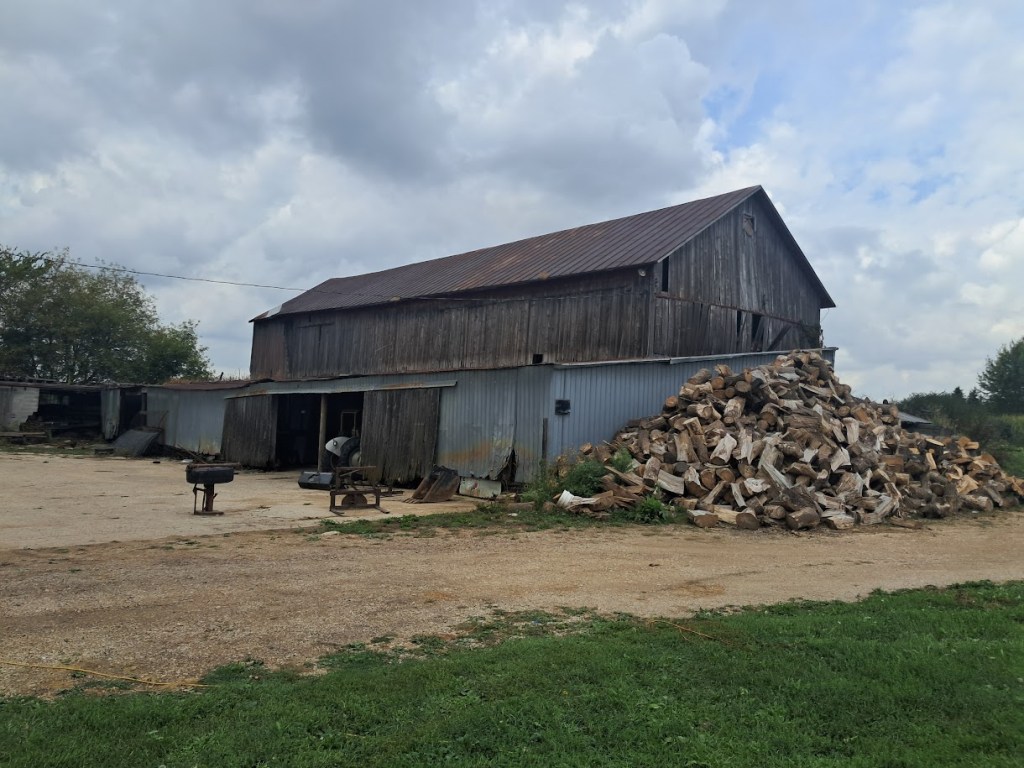
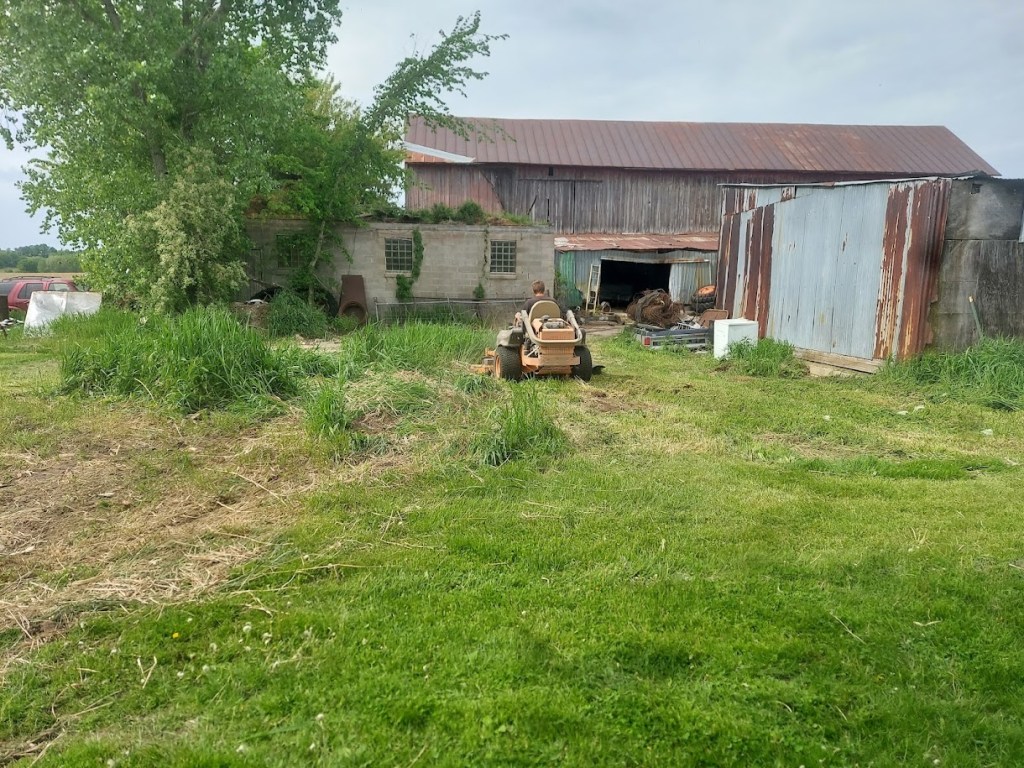
But if I have to pick the most ambitious DIY project, it’s our century farm renovation.
How We Found Our Fixer-Upper
We bought this retired century farm direct from an elderly gentleman who really shouldn’t have been living alone anymore. That detail always hits me hardest—the house and outbuildings told his story before he said a word: sagging floors, peeling paint, leaning sheds, untouched corners for years. It’s heartbreaking how someone can quietly tolerate an increasingly difficult life until clutter and inconveniences feel normal.
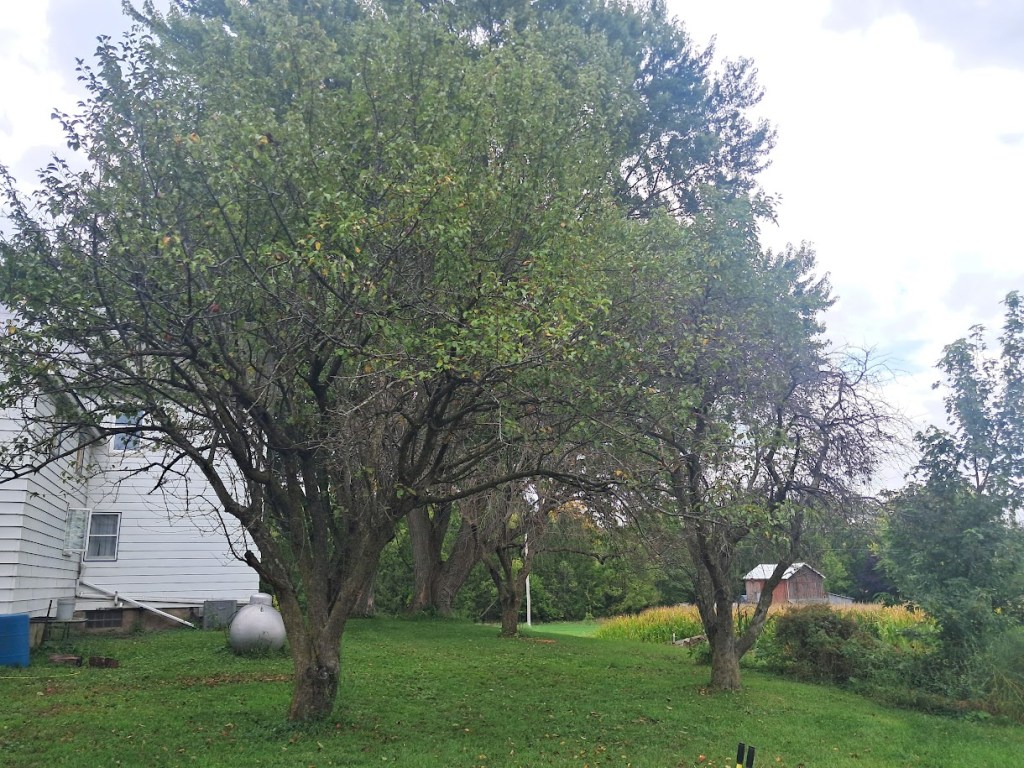
Truth be told, I was reluctant to take on something of this magnitude. I was pregnant when we bought the property in May 2023, and we gave birth and cared for a newborn while gutting the house. My husband saw the potential first: the grand century farm history, an established apple orchard out back, that stone building one previous owner built stone-by-stone over years. I slowly fell for its charm though.
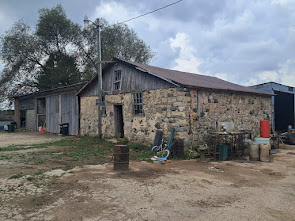
The established apple orchard was a big draw to the place. There are more trees behind me.There’s so much history in this stone building.The barn has a straight roof, but the foundation is crumbling.
DIY Property Cleanup: The Early Days
This homestead renovation kicked off with multiple dumpsters and serious elbow grease. And we had huge help from family who pitched in by cleaning inside and outside, gutting the upstairs, drywalling, and painting. A project this big would be impossible to tackle alone.
Some days it was just hauling—load after load of scrap metal from the barn and yard. We’d sift trash from treasure: broken tools, mystery parts, an old milk can a previous owner painted with a beautiful farm scene. Each dump run made the place feel lighter, easier to breathe.
We patched dilapidated outbuildings and tamed overgrown grass. Slowly, this century farm started showing its grand history.
As we cleaned up the long grass.
Gutting the Victorian Farmhouse (While Living Here)
Inside, we gutted the upstairs. We ripped out lath and plaster, those weird tiny rooms, and bizarre “fixes.” As we did so, we uncovered the beautiful Victorian farmhouse bones.
All while raising little kids (including that newborn!) and working our day jobs.
My husband handles the heavy DIY homestead projects: hauling, demo, repairs, and those endless “little jobs” that are never little. To us, it makes perfect sense. He loves fixing things, which has been perfect for reviving this tired place. I’ve managed kids, work, and keeping our half-gutted household running.
I never did capture the actual gutting process and removing the lath and plaster. But this is after some drywalling was done on the upper floor.
3 Years In: Where We Stand
Three years into this century farm renovation (bought May 2023), two-thirds of the upstairs is done. Every finished room feels like a small miracle. I still pause in doorways thinking, “Remember what this looked like?”
What’s Next: Future DIY Projects
Still ahead:
Finish the upstairs for a more cohesive feel
Remove the downstairs drop ceiling, uncover tall Victorian ceilings
Decide what to do with the old barn foundation (it’s caving in on itself). Do we restore or tear down?
Construct an outside workshop for my husband’s impressive collection of tools and equipment
What Living Through Renovation Teaches You
If I step back and think of it all, it’s incredibly overwhelming. We’re years in, and still have years left. But here’s the thing about ambitious DIY projects you live inside: they grow you while you’re working on them.
We’ve learned patience, because nothing happens as quickly as we hope. We’ve learned teamwork, because we each bring different strengths to the table. We’ve learned to spot progress in inches instead of miles: a cleared fenceline, a finished room, a barn corner that no longer feels dangerous.
Most of all, we’ve learned that “ambitious” doesn’t always mean flashy or fast. Sometimes it looks like showing up for the same project, day after day, year after year, believing that it’s worth the time, the money, and the heart it requires.
So yes, our Victorian farmhouse and century farm renovation is the most ambitious DIY homestead project we’ve ever undertaken.
But it’s also the one that’s slowly shaping us into the kind of people who can see beauty in broken things and are stubborn enough to try to fix them.
What’s YOUR most ambitious DIY? Tell me below! 🛠️
LIKE if you’ve tackled big homestead renovation projects! SHARE with a friend who can relate! 🏡✨
Loved this? Subscribe for more homesteading stories and tips: