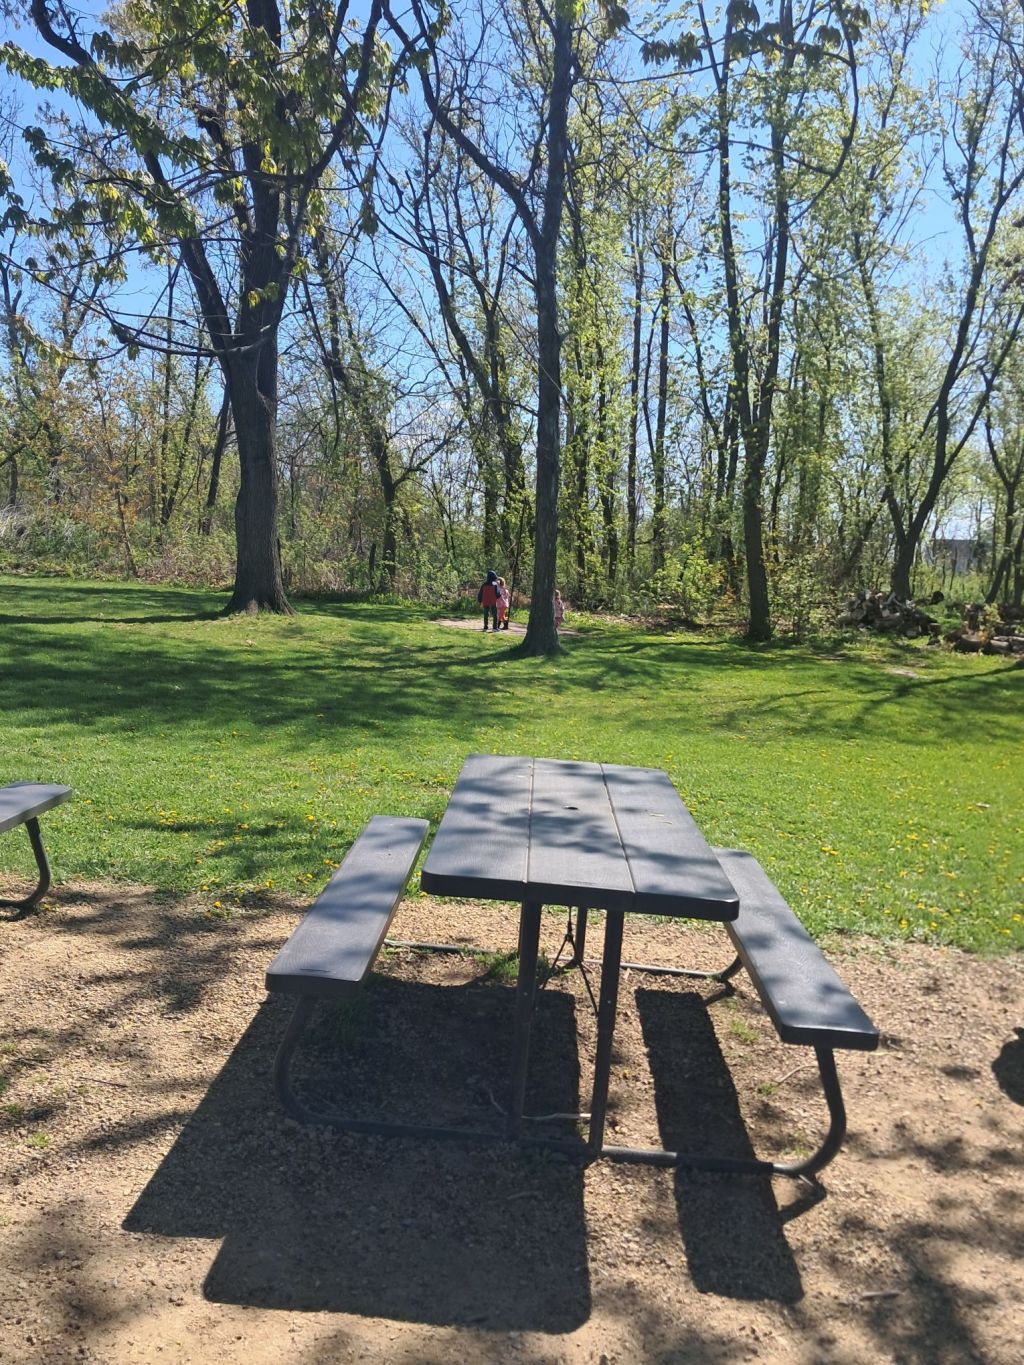
Somehow, it’s already early July. How is your garden doing?
We’re in Zone 4B, and in late May I shared what we planted in our garden this year. In this post, I’m expanding on that first update and sharing how things are going now. How much work have we done so far? What veggies have we harvested already (spoiler: not too many yet, but that’s changing fast!)?
It’s been a fairly wet season so far (with plenty of tornado warnings), which has meant we haven’t had to start watering yet. I expect that to change as July continues and we slide into our usual hotter, drier stretch.
Think of this as a walk-through of our garden rows, plus a few notes on what’s working, what isn’t, and what we’ve noticed already this year.
Strawberries: The Semi-Permanent Front Row
The first two rows of our garden are dedicated to strawberries. This is a semi-permanent location for them. Back in April, we transplanted the plants, and since then we’ve pinched off the blossoms and weeded the rows.
We’ve been pinching blossoms to allow the plants to focus more on strong root and leaf growth, but have recently stopped. We’ve harvested a grand total of two berries so far (and they’re delicious!). Besides the berries, the plants themselves have sent off large shoots that re‑root themselves. We’ve been working to direct those so they don’t take over the middle of the row.
Root Vegetables: Fresh Salads Now, Storage Roots Later
The next rows are dedicated to root vegetables and salad greens. These rows have shown a rapid return, with us harvesting many salads’ worth of lettuce and spinach (my salad spinner is working overtime!), and we’ve finished harvesting radishes.
Other veggie updates:
Parsnips: They didn’t come up well, so we replanted a couple of weeks ago.
Carrots: They’re coming up great, and we hope to harvest our first fresh carrots (nature’s candy) within the next couple of weeks. My son cannot wait.
Beets: We hope to harvest these soon too.
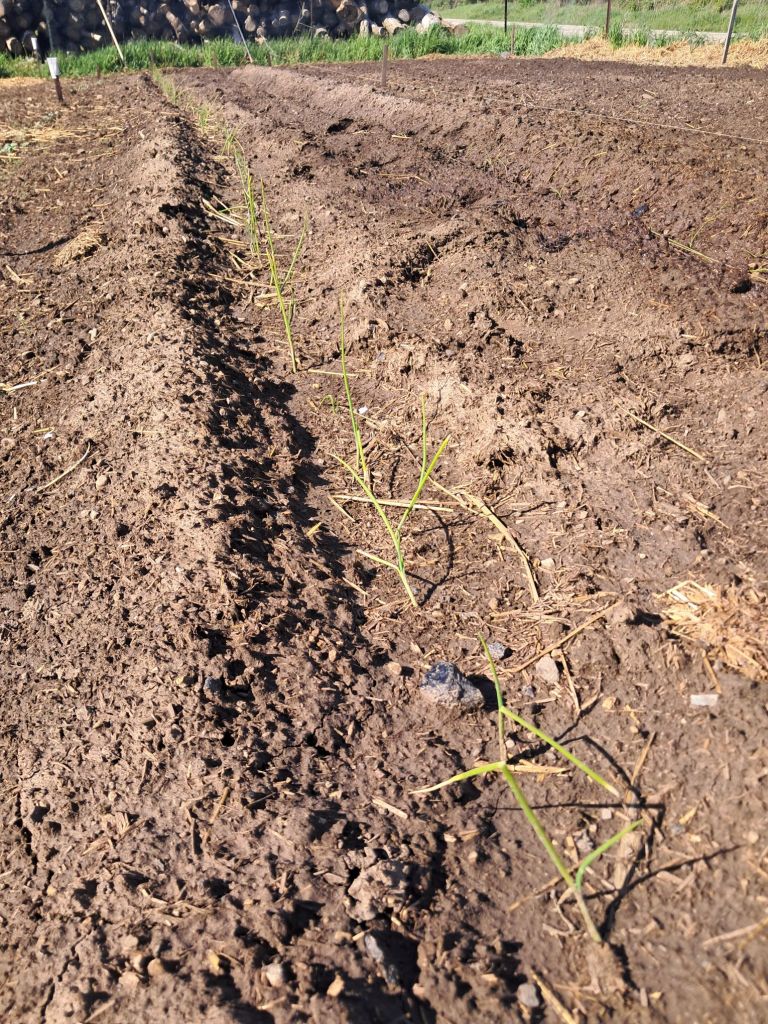
Red and Yellow Onions
After the root bed come two full rows of onions—both red and yellow.
Our transplanted yellow onions have been growing vigorously; they are now about the size of baseballs. Our red onions are a little further behind, but are still quite healthy.
We’ve started harvesting some of the larger yellow onions. Fresh onions from the garden are divine!
Peas: Kid-Favorite Garden Candy
Our peas are starting to blossom, which means any week now they’ll begin producing. The kids think of them as garden candy, and eat them straight from the vine.
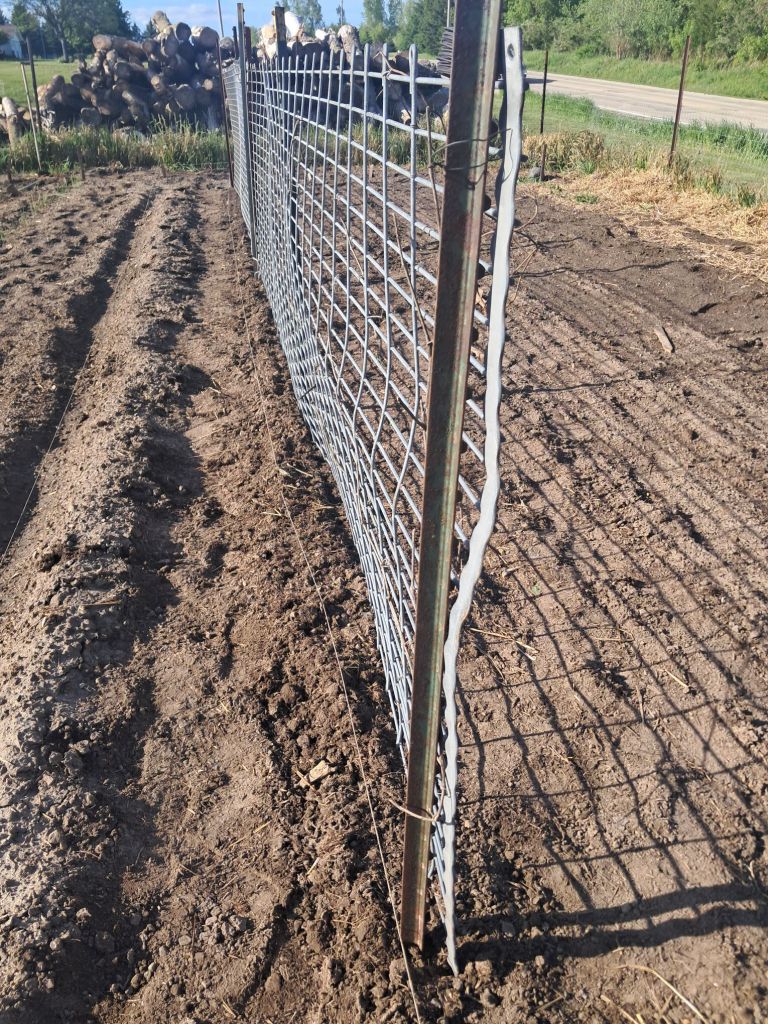
Cucumbers in the Middle (On Purpose) + Tomatoes and Peppers
The cucumbers are coming up well and are starting to blossom. We’ll start getting cucumbers in just a couple of weeks. We planted them in the middle of the garden on purpose, where they’re easy to water and can climb on a trellis without taking over the edges.
I did see my first cucumber beetles this week. Right now I’m just keeping a close eye on them; if anyone has favorite ways to manage cucumber beetles organically, I’d love to hear your advice.
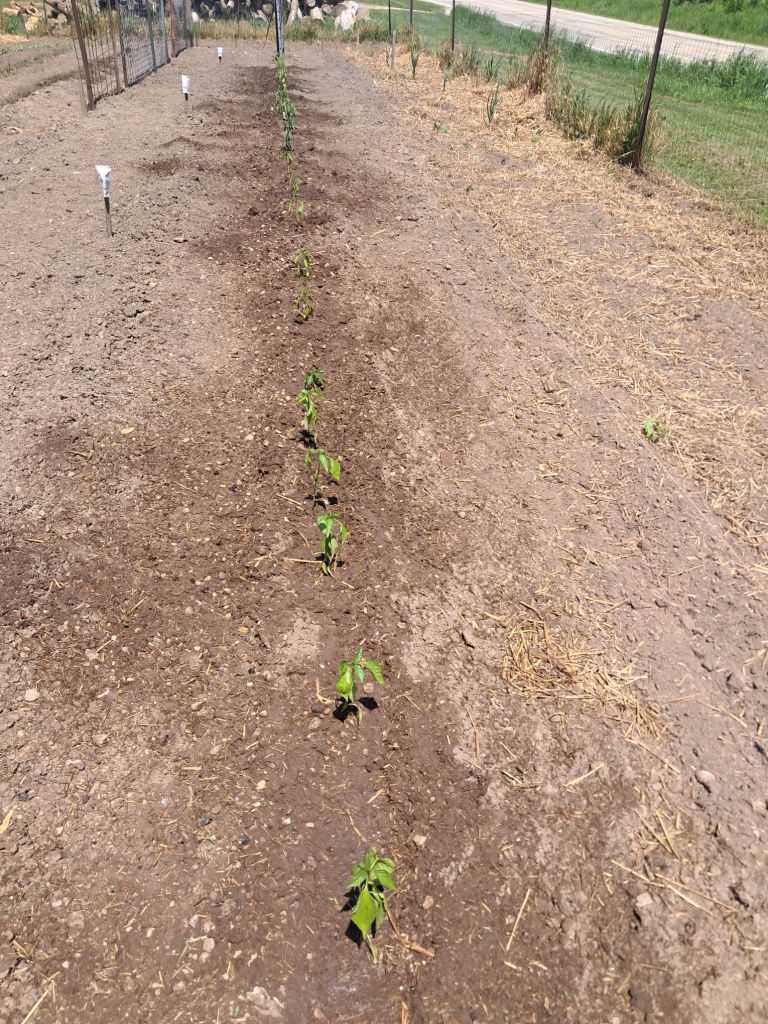
We’ve actually started harvesting some peppers already—delicious!
We have tiny Roma tomatoes on the vine that are steadily getting bigger, and some Early Girls. I expect to get a couple of Early Girls in a couple of weeks, then the Romas and Mortgage Lifters by the end of July into early August.
Cruciferous Row: Cauliflower, Kale, Broccoli, and Brussels Sprouts
I’ve harvested my first kale and made my first batch of Zuppa Toscana. It was lovely—though maybe not the best meal to eat on a 90‑degree day, haha.
Cauliflower, broccoli, and Brussels sprouts haven’t produced yet. I expect the broccoli to start producing within the next couple of weeks. The Brussels sprouts will likely be ready in about 2–3 months (they have a long growing period).
Cabbage, Bok Choy, and Kohlrabi
The next row is a mix of:
Cabbage: Destined for sauerkraut, boiled cabbage, and coleslaw. Not ready yet, but I expect smaller heads to be ready in about a month.
Bok choy: We harvested our first head, and it was delicious in our beef stir fry.
Kohlrabi: The “heads” are starting to form (they look like a little bulb with leafy hair coming out).
Summer Squash, Rutabagas, and a Few Flowers
In the back corner of the garden, we planted summer squash—three hills of it.
In my unsolicited opinion, three hills is about two hills too many. If you’ve ever been buried in zucchini or summer squash, you know exactly what I mean. We also have several volunteer squash plants coming up in random spots throughout the garden. If a volunteer squash plant pops up in a really inconvenient spot (where it will interfere with my favorite veggies), I pull it out.
The rest of that row holds garlic and rutabagas:
We plan to harvest the four bulbs of garlic within the next couple of weeks.
The interplanted rutabagas will begin to be harvested in about a week or two.
We’ve also tucked marigolds into the garden, which I love both for their pest‑control benefits and because they’re simply beautiful. On top of that, we have a lot of volunteer sunflowers coming up throughout the garden—they add a bit of cheer and should make the bees happy later in the season.
Sweet Corn and Cantaloupe at the Front
The front of the garden holds our sweet corn patch. It’s doing well so far. They always say corn is doing well if it’s “knee high by the Fourth of July,” and this year it’s about waist high (I’m writing this on the Fourth). I suspect we will be battling the raccoons and possums for the crop later in the season, and I hope we win at least some this time!
The cantaloupe patch is on the other side. So far, so good—the plants are still small, but they grow fast this time of year. I expect to harvest our first cantaloupes in about a month.
How Much Weeding We’ve Done (So Far)
We weed the garden the most at the beginning of the garden season. My dad has always said, “You win or lose the battle with weeds in the month of June,” and I wholeheartedly agree.
If you catch them early and don’t let them go to seed, there are fewer by the end of the year (although you still have to do maintenance weeding after that). In June, my husband and I have spent an average of 3–4 hours per week on weeding. As the weather gets drier and the plants start to shade out more of the garden, I expect that time to be drastically reduced, down to about an hour per week.
I’ll shift that “extra” time to harvesting and preservation as the season continues. Stay tuned for all the ways I like to preserve garden‑fresh veggies!
Potatoes, Pumpkins, and Future Plans
Beyond the main garden rows, we have two additional patches:
The potato patch has been hilled, and we’re starting to find the dastardly potato bugs (both the babies and the adults). For now we’re picking them off by hand and doing our best to stay ahead of them.
Behind our barn, we have established a pumpkin patch, and I’m already picturing fall—whether that means jack‑o’‑lanterns, pies, or both.
So far, I don’t have big “lessons learned” to share this season. I’m sure they’re coming as the summer unfolds, but right now we’re mostly observing, adjusting as needed, and enjoying the early harvests.
That’s where things stand in our Zone 4B garden this early July.
If you’re gardening in a similar climate, I’d love to hear: what’s thriving for you right now, what pests you’re seeing, and what’s been your biggest surprise so far this season?
If this garden tour was helpful or encouraging, would you share it with another gardener—especially someone in a colder zone? Your shares and comments help these updates reach more folks who are growing right alongside us.
As June Dairy Month comes to a close, I’ve been thinking about how much this month’s writing has revolved around farmers, hayfields, and the quiet weight of rural life. It wasn’t a strategic content plan so much as an honest outflow of what’s on my heart—and on my mind—this time of year.
In case you missed any of the recent posts (or want to revisit them with fresh eyes), here’s a look back at the stories we’ve walked through together.
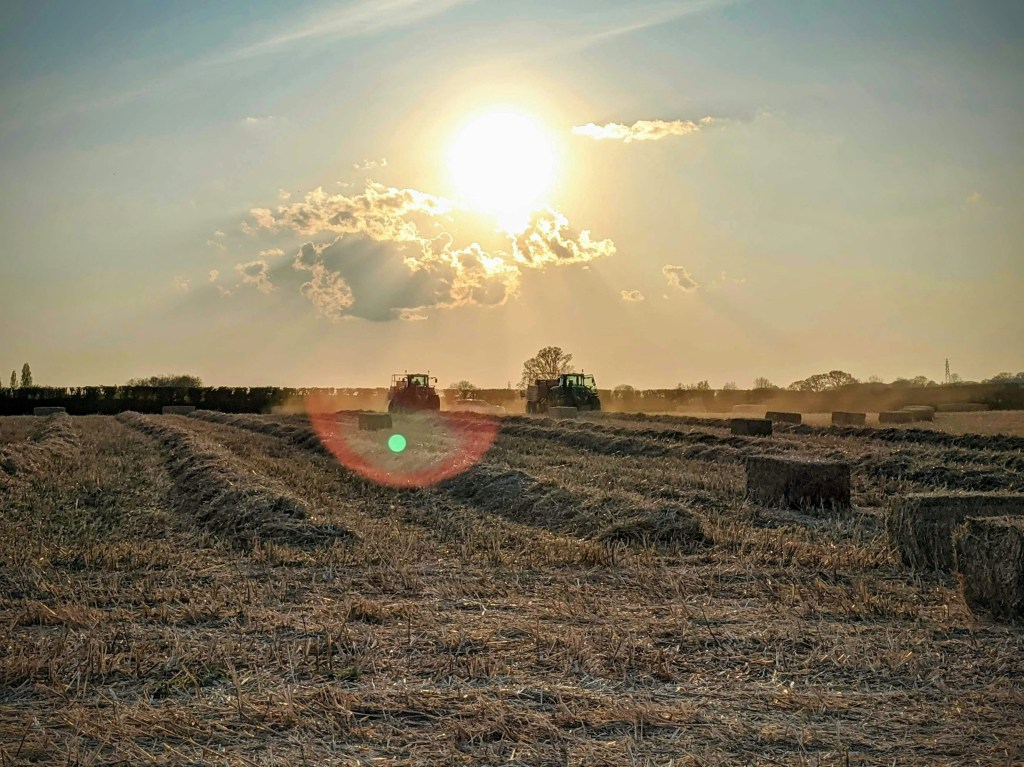
In one post, I took you out to the hayfield, where an old New Holland baler still clatters its way across the field, tying bales as steadily as it did in the 1960s. We followed its story from my grandfather’s horse-drawn days, through my dad’s years of frantic shear-pin changes and late‑night repairs, all the way to today’s summers under my father’s care.
That baler became more than a machine—it stood in for a family legacy of persistence, resourcefulness, and care passed down from one set of hands to the next. Each bale it drops is a small monument to the people who refused to let it quit.
Another post shifted from machinery to identity. I shared my “confession” that, for years, I tried to tuck my farm background away—doing just enough chores, avoiding being “too farm kid,” and choosing choirs over FFA. I wanted the values without the label.
But homesteading habits kept creeping back: blanching green beans, learning to make sauerkraut, failing (and eventually succeeding) at homemade pizza. A glut of cucumbers and a Facebook post finally opened my eyes to how unusual my access to fresh food really was—and how much others valued what I took for granted.
Through coworkers’ questions and friends’ enthusiasm, I began to see my rural upbringing not as a liability, but as an asset: a source of work ethic, resourcefulness, and a perspective that still shapes how I parent, homestead, and show up in my community.
We also zoomed out to look more directly at farmer mental health. That post walked through the way farming has changed over the past forty years: fewer, larger farms; bigger equipment; “land rich and cash poor” realities; new diseases and pests; and markets that feel like a roller coaster.
Layer by layer, we named the unseen pressures—chronic stress, isolation, identity and legacy, and stigma around asking for help. The goal wasn’t to drown anyone in statistics, but to give words to what many farmers and farm families are already feeling: that toughness doesn’t make you immune to stress, and that talking about it is an act of courage, not weakness.
We also talked about what farmers need to hear (that being exhausted doesn’t mean you’re failing) and what the rest of us can do in small but meaningful ways: listening well, supporting local, sharing resources, and checking in after hard news.
In honor of June Dairy Month, another piece turned the camera toward what June actually feels like on the farm. While towns see smiling cow posters, ice cream specials, and farm breakfasts, farmers see early alarms, hot barns, hayfields racing storms, and bills riding in their back pockets.
I shared memories of June as “hold on tight and hope the machinery cooperates,” and explored how it can feel to be “celebrated” while you’re barely keeping up. For some, June Dairy Month is joyful; for others, it’s complicated. We imagined what farmers might actually want this month: fewer speeches and more listening, real prayers for safety and rest, quiet texts that say, “How are you holding up?” and resources that gently say, “You don’t have to carry this alone.”
I also mention practical ways to honor farmers—asking better questions, dropping off food or encouragement during haying, and telling kids the story behind the milk in their glasses.
Most recently, I shared a story from before I was born, about how one small act—stopping to help on a red barn roof—turned two neighboring farmers into lifelong friends. A neighbor pulled in, climbed up despite a fear of heights, and offered a hand. From that afternoon on the peak, their lives became deeply intertwined through haying days, shared meals, weddings, and tough seasons.
As a kid, I joined those hay crews, stacked bales until I was covered in dust, and ate big meals that felt like our own modern threshing bees. Looking back, I can see how that one moment of courage and kindness rippled through decades and shaped the community I grew up in.
What Threads These Stories Together
Across all these posts, a few themes keep surfacing:
The steady, sometimes unnoticed persistence of farmers and farm families
The way small acts—fixing an old baler, sharing cucumbers, stopping to help on a roof—carry forward into generations
The tension between public celebrations of agriculture and the private weight many farmers carry
The quiet, sturdy beauty of rural friendships and communities
June Dairy Month may be the official reason to talk about cows and fields, but the stories don’t fit neatly into one month on a calendar. They’re ongoing, season after season.
If one of these posts resonated with you, I’m glad you were here. And if you’re a farmer, or love one, thank you—for the work you do, the courage it takes, and the stories you’re still living.
If you have a minute, I’d love to know: which of these stories stuck with you most, and what would you like to see more of in the months ahead?
If you know someone who loves farm stories—or someone who lives them—would you share this recap with them? Your shares and comments help these stories find the people who need them.
Hay season means long days, heavy decisions, and worries that don’t clock out when the sun gets low.
When most people picture a farmer, they imagine strong hands, early mornings, and a deep connection to the land. Those things are true. But what’s less visible is the mental and emotional weight that modern farmers carry—often in silence.
Over the last 40 years, farming has changed dramatically. We’ve seen consolidated farms, bigger machinery, larger herds, and new technology. Alongside those changes came something else: bigger debt, more uncertainty, and worries that don’t clock out when the day is done.
This piece isn’t about statistics. It’s about naming some of the pressures farmers feel, and why mental health deserves to be part of the conversation when we talk about agriculture.
From Many Small Farms to Fewer, Bigger Ones
A generation or two ago, it was common to see many small and mid-sized family farms clustered within a few miles of each other. They could lean on each other for basic help. My dad and a good farmer friend lived two miles apart and shared haymaking equipment and labor. We would spend a day baling hay at the friend’s place, and another day baling hay on our farm.
On a good day with lots of help, we could bale and put away 2,000–3,000 small square bales—enough to fill a hay mow from the floor to the rafters and keep a dairy herd fed for months. All the while, we had good conversations, got a solid workout, and ate a good meal afterward. There was a sense of satisfaction I didn’t fully appreciate at the time as I coughed up dust all night and well into the next day. We could rely on each other for reciprocal help that taught me what true community support looks like.
Over the past few decades:
Many small operations have closed or merged.
Land has consolidated into fewer, larger farms.
Surviving farms often feel pressure to “get bigger or get out.”
This shift means:
Less shared workload between neighbors.
More land, animals, and responsibilities on fewer shoulders.
A sense of loss—not just of businesses, but of communities and a way of life.
My dad and his friend both sold their cows around the same time. I remember the farm auction they jointly held when I was an early teenager. At the time, I was thrilled that we didn’t have the cows anymore. In adulthood, that relief turned into sadness, because it meant there were two fewer dairy farms in the area. Now, the farms with 100 or fewer cows are few and far between. My dad used to joke that FFA—“Future Farmers of America”—really stood for “Father Farming Alone.” He wasn’t wrong.
For the farmers who remain, this consolidation can bring a mix of gratitude (for still being here) and grief (for those who aren’t).
“Land Rich,” Cash Poor
Another layer in all of this is what people sometimes call being “land rich.”
Many farmers:
Own or are paying on hundreds of acres of land.
Have barns, sheds, and equipment worth significant money on paper.
From the outside, it can look like wealth. But the reality is often:
Most of that value is tied up in land and buildings that can’t be easily sold without dismantling the farm.
Day-to-day cash flow can be tight, especially when prices are low or inputs are high.
The same land that represents security also represents responsibility, taxes, and debt.
Being “land rich and cash poor” is its own kind of mental strain. Farmers can feel:
Trapped between the desire to keep the farm going and the weight of the bills.
Guilty for even considering selling something that generations built.
Misunderstood by people who only see acreage and assume comfort, not stress.
When the balance sheet says “asset,” but the checking account says “barely,” it adds another quiet layer of pressure.
Bigger Equipment, Bigger Debt
With larger farms comes larger equipment:
Bigger tractors, combines, balers, and harvesters.
More sophisticated technology—GPS, monitors, sensors, and software.
These tools can boost efficiency, but they come at a cost:
High purchase prices, ongoing payments, and subscription fees.
Expensive parts and repairs when something breaks (usually at the worst possible time).
The constant knowledge that a breakdown—or a bad year—could put the whole operation at risk.
Carrying that level of debt isn’t just a line item in a budget. It’s a weight in the back of a farmer’s mind, especially at night. Farming has always been stressful, but when you add costs that are ten or a hundred times higher than they used to be, the stress compounds right along with it.
Mutating Diseases, New Pests, and Biosecurity Worries
The last few decades have also brought:
New or mutating livestock diseases.
Crop diseases and pests that adapt quickly.
Rising biosecurity concerns, especially with larger, more concentrated herds.
This adds another layer of stress:
One outbreak can threaten years of hard work.
Farmers must constantly update protocols, vaccinations, and preventative care.
There’s a nagging worry: “What if something slips through? What if we miss something?”
The responsibility of caring for animals and crops isn’t just physical; it’s emotional. When animals get sick or crops fail, it can feel like a personal failure—even when it isn’t.
I recently heard the sad story of a local strawberry farm that lost much of its crop to a disease that thrives in wet soil after a particularly rainy spring. I’ve also watched them rebound in a way that is truly inspiring—launching a strawberry-scented skincare line made from the berries they could salvage and using their platform to educate the public about soil health. Even in resilience, you can feel the weight of what was lost and the effort it took for them to pivot.
Markets That Feel Like a Roller Coaster
Farmers today live with:
Fluctuating commodity prices.
Sudden changes in demand, trade policies, and global events.
Input costs (fuel, fertilizer, feed, repairs) that don’t always match what they’re paid.
That means:
It’s harder to plan even one year ahead, let alone several.
A good production year doesn’t always mean a good financial year.
Farmers carry the constant question: “Will this be the year we can’t make it work?”
Uncertainty isn’t just a math problem. It’s a mental burden—especially when an entire family’s livelihood, legacy, and identity are tied to the farm.
More Worries, Less Margin for Error
Put all of that together, and you get a heavy load:
Bigger farms and fewer people to share the work.
Bigger machines and bigger debts.
Disease, pests, and biosecurity concerns that never truly go away.
Markets that can swing wildly from one season to the next.
Land that looks like wealth on paper, but doesn’t always translate into financial breathing room.
And yet, despite all this, many farmers still:
Get up before sunrise.
Work long days in all kinds of weather.
Care deeply about their animals, crops, and customers.
Try to show up at community events and be good neighbors.
They do it not because it’s an easy business decision, but because farming is a calling—a way of life they care about too deeply to walk away from lightly.
From the outside, it’s easy to see just the toughness. From the inside, farmers know: toughness doesn’t make you immune to stress, anxiety, or depression. It just makes you more likely to keep quiet about it.
The Quiet Strain on Farmer Mental Health
Some common mental health pressures on farmers include:
Chronic stress. There is always something to worry about—weather, prices, animals, equipment, finances.
Isolation. Many farms are rural and remote, with fewer opportunities to socialize or talk openly about struggles. The isolation has only increased as farms have consolidated and neighbors have sold out.
Identity and legacy. The farm often isn’t “just a job.” It’s a family identity and a multi-generation story. The fear of being “the one who couldn’t keep it going” runs deep.
Stigma. In many farm communities, there’s an unspoken rule: you work hard, keep your head down, and don’t complain. Asking for help can feel like weakness, even when it’s actually courage.
It’s not unusual for farmers to feel:
Overwhelmed
Guilty for feeling overwhelmed
Unsure where to turn or what resources exist
Naming these realities doesn’t mean farmers are broken. It means they’re human.
What Farmers Need to Hear
If you’re a farmer, or married to one, or raising farm kids, you may need to hear that:
Feeling stressed or anxious doesn’t mean you’re failing.
Being exhausted by the weight of decisions and responsibilities is understandable.
You are not the only one who lies awake at night worrying about the bank, the herd, the crops, the land, the next generation.
Talking to someone—a friend, pastor, counselor, doctor—is not a sign of weakness. It’s one more way of caring for your farm and family, because you are part of both.
What the Rest of Us Can Do
For those who aren’t farming but care about farmers, there are small but meaningful ways to help:
Acknowledge the weight. Simply saying, “I know things are tough right now, and I appreciate what you do,” can matter more than you realize.
Listen without minimizing. Resist the urge to say “It’ll all work out” or “At least you get to live in the country.” Instead try: “That sounds really hard. Do you want to talk about it?”
Support local when you can. Buying from local farms and small businesses helps, even if it’s not a complete solution.
Share resources. If you hear about mental health hotlines, local support groups, or farm stress programs, pass them along without pressure: “I saw this and thought it might be useful if you ever wanted it.”
Check in after hard news. A bad storm, a price crash, a big equipment breakdown—these are good times to send a message or stop by.
A Small Invitation
Over the past 40 years, farms have gotten bigger, equipment has gotten bigger, and the to-do lists and worries have grown right alongside them. What hasn’t grown at the same pace is our willingness to talk honestly about what all of that does to a farmer’s mind and heart.
For many farmers, this work is more than a career. It’s a calling they’ve been born into, chosen, or both—and that’s part of why the weight can feel so heavy.
I don’t pretend to speak for every farmer or every situation, but these are some of the patterns I’ve seen and lived.
We can’t solve everything in one conversation or one blog post. But we can:
Start naming the pressures.
Make it normal to talk about stress and mental health in farm communities.
Remind farmers that their worth is not measured only in bushels, pounds, acres, or how many acres they “own” on paper.
If you’re a farmer, or you love one, I hope this gives you language for some of what you’re feeling—or seeing.
And if you’re reading this from town or city, maybe the next time you pass a tractor on the road, pour a glass of milk, have a steak, or drive by a field, you’ll remember: behind that scene is a person carrying more than just a workload.
If you feel comfortable sharing, I’d love to hear: what’s one thing you wish people understood about the mental load farmers carry—or one small way you think we could better support them?
If this post helped put words to what you’ve seen or felt, would you share it with someone who cares about farmers—or save it to revisit later? Your stories matter too. I’d be honored if you shared a small piece of your experience or tagged a farmer who deserves a quiet “thank you.”
For a long time, that sentence felt like something I needed to tuck away, not lead with. In high school, I carefully sidestepped anything that might mark me as “too farm kid.” I avoided FFA and agriculture classes, choosing instead to spend time with the choir crowd—some of the kindest people you’ll ever meet (and, let’s be honest, who doesn’t love friends who can sing?).
On the surface, I was doing what a lot of teenagers do: trying to blend in. Underneath, I was quietly distancing myself from a way of life that had shaped me more than I realized.
Trying to Tuck My Farm Roots Away
Looking back, I can see how much effort I put into not looking “too farm.”
I did the bare minimum caring for the steers assigned to me.
I half-heartedly tended the garden that had been so generously entrusted to my “care.”
I laughed off my farm chores as “no big deal,” even when they meant missing events or coming to school smelling faintly of silage.
I share more about the steers here, but the short version is this: I wanted the values of my upbringing (work ethic, responsibility, resourcefulness) without the label that came with them. I thought being “the farm kid” made me less interesting, less sophisticated, less…something.
Even in college, I was hesitant to share details about my rural background. I listened to friends talk about their favorite coffee shops and city neighborhoods, and I stayed quiet about gravel roads, hay balers, and cleaning cow yards.
The Homesteading Bug That Never Quite Left
And yet, there was always a part of me that genuinely enjoyed homesteading.
The summer after my freshman year of college, I found myself slipping back into familiar rhythms:
I spent days blanching and freezing green beans.
I asked my dad to teach me how to make sauerkraut.
It was as if my hands remembered what my pride wanted to forget. I loved the feeling of putting food by, the satisfaction of seeing freezer bags full of vegetables, and the simple rhythm of working alongside my parents.
At the time, I still didn’t connect this with identity. It just felt like “what we do in the summer”—use what we have, store what we can, waste as little as possible.
The Cucumber Story That Started to Change My Perspective
I remember clearly when my perspective started to shift.
Shortly before my junior year of college, our garden produced a glut of cucumbers. In a moment of practicality, I posted on Facebook asking if anyone wanted some. Several college friends responded enthusiastically.
I didn’t believe they were serious.
To me, cucumbers were just…there. They showed up in the garden, we ate what we wanted, and the rest sometimes ended up in the compost if we couldn’t keep up. I assumed everyone had access to as many fresh vegetables as they wanted, if they just “put in the effort.”
So I left the cucumbers at home.
When I saw my friends later, their disappointed faces told me I’d made a mistake. They had genuinely looked forward to those garden-fresh cucumbers. In that moment, it hit me: my experience of having plentiful fresh vegetables was not typical. What I saw as ordinary was, to many others, special.
That simple misunderstanding planted a metaphorical seed. Maybe my farm background wasn’t something to hide. Maybe it was something to share.
Realizing My Background Was an Asset, Not a Liability
Later, at my post-college job, that seed grew.
Coworkers would ask the usual small-talk questions: “Where did you grow up?” “What did your parents do?” When I mentioned my agricultural background—dairy cows, hay fields, chores before school—I was surprised by their reactions.
They were impressed.
They asked follow-up questions. They wanted to know what milking was like, how long haying days really were, what it meant to care for animals every single day. They didn’t hear “small town, limited experience.” They heard “work ethic,” “responsibility,” and “a perspective I don’t have.”
Slowly, I began to see that the very things I had once tried to downplay were the things that made my story unique and valuable.
What Farm Life Actually Gave Me
When I think about my farm childhood now, I don’t just see early mornings and missed parties. I see the deeper gifts standing behind them:
A strong work ethic. You show up even when you’re tired, because the animals still need care.
Follow-through. You don’t quit halfway through cleaning the yard or milking a herd.
Resourcefulness. You learn to fix things, make do, and find ways to stretch what you have.
Respect for land and animals. You see firsthand that your choices affect living creatures and the soil under your feet.
Community awareness. You understand that your work feeds people you know by name.
Those values follow me into parenting, into how I manage our small homestead now, and into how I show up in my community.
Sharing the “Confession” with Pride
Today, I share my “confession”—that I grew up on a farm—not as something to gloss over, but as something I’m proud of.
I’m proud of:
My parents, who modeled consistency and care when no one was watching.
My extended family, who have been (and still are) stewards of the land.
The countless farmers who live out the same story in their own quiet, steadfast way.
I’m also grateful for the friends and coworkers who helped me see my background differently—those who wanted the cucumbers I thought were nothing special, and those who lit up when I shared stories about dairy cows and hay fields.
A Note of Thanks for June Dairy Month
So, in the spirit of June Dairy Month, consider this post a small thank-you:
To the farmers who are up before dawn, again.
To the families who build their lives around the needs of animals and land.
To the kids who might someday feel tempted to hide their farm roots, just like I did.
If you’re one of those kids, I hope you’ll come to see what I finally did: your story matters, and your background is a strength—not something to be smoothed over.
Happy June Dairy Month—to all the hardworking farmers out there, and especially to the friends and family who keep showing up, season after season.
If this story resonated with you—or reminded you of your own farm kid days—would you share it with a friend or save it for later?
I’d also love to hear from you: did you grow up on a farm, or are you just now learning where your food comes from? Your perspective matters too.
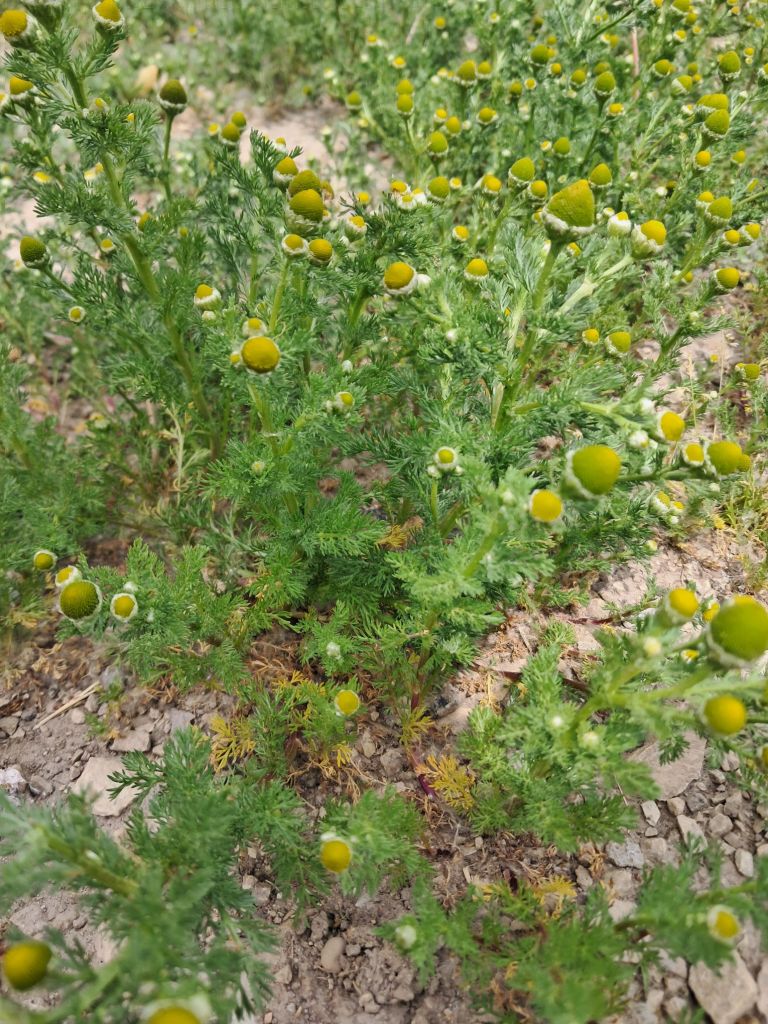
I always knew about chamomile tea. I’d heard people talk about winding down with a mug before bed and mention the health benefits—things like calming the nervous system, easing digestion, and supporting better sleep.
What I didn’t know was that you could forage your own chamomile blossoms…until I watched my husband’s grandmother do it.
She walked right out into the driveway and started picking what I had always thought were just little white-and-yellow weeds. It was like a lightbulb went off in my head. These “weeds” I’d seen growing all over the driveway actually produce a delicious tea? Mind officially blown.
If you’re not familiar with foraging your own chamomile, this is a simple guide to help you:
Recognize chamomile in the wild
Harvest it (bonus points if you involve kids)
Dry and store it
Brew your own homemade chamomile tea whenever you want—without the grocery store bill
As always, I’m sharing our experience for informational purposes; it’s not medical advice.
Where Chamomile Likes to Grow
One of the most surprising things about chamomile is where it chooses to grow. It doesn’t always show up in neat garden rows or carefully tended herb beds.
You’ll often find it in:
Gravel driveways and along the edges of paths
Road ditches and disturbed soil
Around barnyards, fence lines, and well-traveled areas
Sometimes in garden beds if it’s self-seeded or naturalized
It seems to have a soft spot for tough, compacted, “nobody wants to grow here” spots—which is part of its charm. Once you know what you’re looking for, you may start seeing it everywhere.
Chamomile typically blooms through much of the warmer season, often late spring into summer depending on your climate. That’s the time of year you’ll want to start scanning those driveways and ditches for blossoms.
If you’re foraging near roads, be mindful of:
Spraying (avoid areas that may have been treated with herbicides)
Pet or livestock traffic (look for cleaner patches)
Traffic dust and grime (driveways and paths on your own property are usually a safer bet)
What Chamomile Looks Like (and Smells Like)
Before you start picking anything, it’s important to be confident in what you’re harvesting.
Chamomile generally has:
Small daisy-like flowers
White petals
Yellow, dome-shaped center
Fine, feathery leaves
Light, airy, almost carrot-top-like foliage
A sweet, apple-like scent when you crush the flower heads between your fingers
A few simple tips:
Look for patches of low-growing plants with lots of little white-and-yellow flowers rather than single, tall stems here and there.
Rub a flower gently between your fingers and smell it. That sweet, apple-y scent is a good sign you’re in the right place.
There are a few different chamomile and chamomile-lookalike species out there, and some “daisy” weeds can be mistaken for chamomile at first glance. If you’re unsure, start in a spot where you know chamomile has already been identified correctly (a family member’s patch, a friend’s garden, or your own yard from purchased seed), and cross-check with a field guide or trusted resource before branching out into roadside foraging.
How to Harvest Chamomile Blossoms
When you’re ready to harvest, focus on the flower heads rather than the stems and leaves.
Basic harvesting steps:
Choose a dry day. Harvest when the flowers are dry (late morning or afternoon is usually best, after the dew has evaporated).
Look for open flowers. Pick blossoms that are fully open and cheerful-looking—not browned or fading.
Pinch or snip. Gently pinch the flower head between your fingers and thumb and pop it off the stem, or use small scissors if you prefer.
You don’t need the whole stem for tea—just the flower heads. Stems and leaves can be a bit more bitter and aren’t necessary for a nice cup of chamomile.
In a short picking session, you can easily gather enough blossoms to fill a small bowl or two, which will translate into several jars’ worth of tea once they’re dried.
Make It a Family Foraging Activity
Chamomile harvesting is a perfect kid job.
Why it works so well with children:
The flowers are low to the ground and easy to reach.
The “popping” motion of picking the flower heads is actually fun.
There’s a clear, satisfying end product: “We’re picking these to make tea we’ll drink later.”
Give each child:
A small basket, bowl, or container
A simple instruction: “We’re picking the little white flowers with yellow centers—no leaves, no grass.”
It’s a gentle way to:
Teach plant identification
Talk about where our food and herbs come from
Connect everyday “weeds” to real, useful things in your kitchen
How to Dry Chamomile for Tea
After you’ve picked a bowl of blossoms, it’s time to dry them so they don’t mold and will keep well through the year.
Option 1: Using a Dehydrator
Ready to steep and drink!
If you have a dehydrator, this is the most controlled method.
Spread the blossoms in a single layer on your dehydrator trays.
Set the temperature to around 95°F (a low, gentle setting to preserve flavor and color).
Dry for about 24 hours, or until the flowers are completely dry and papery to the touch.
Test a few by crushing them between your fingers—there should be no softness, just a dry crumble.
Option 2: Air-Drying or Sun-Drying
If you don’t have a dehydrator, you can still dry chamomile.
Spread the blossoms in a single layer on a clean screen, rack, or baking sheet.
Place them in a warm, dry place out of direct rain and heavy dew.
Make sure there is good airflow—near a sunny window or in a protected, breezy spot outside works well.
Gently stir or turn them once a day so they dry evenly.
Depending on humidity, it may take several days. Again, you want the blossoms fully dry and crisp before storing.
How to Store Dried Chamomile
Once your flowers are fully dry, you can store them for months.
Simple storage options:
Glass jars with lids (mason jars work great)
Clean, food-safe containers with tight-fitting lids
Or, going old-school: something like a washed and dried Cool Whip container, just like my husband’s grandmother used
Whichever container you choose, keep it:
In a cool, dry place
Out of direct sunlight
Labeled with the contents and date
Properly dried and stored, your chamomile should keep its flavor and gentle fragrance for a year or more.
Brewing Your Own Foraged Chamomile Tea
Now for the best part: turning those foraged blossoms into a cozy mug of tea.
I have chamomile tea, the kids are drinking other tea tonight!
On a cool winter night (or whenever you need a moment to relax), you can:
Take a tea ball, reusable tea bag, or small infuser.
Add about 1 tablespoon of dried chamomile flowers per cup of water.
Pour boiling water over the tea.
Let it steep for about 5 minutes (longer if you like a stronger flavor).
Remove the infuser, let the tea cool slightly, and enjoy.
You can drink it:
Plain
With a drizzle of honey
With a splash of milk or cream, if you like it a little softer
For us, it’s become a go-to when someone needs to unwind or has a slightly unsettled stomach, and there’s something extra special about knowing you picked those flowers yourself.
A Few Gentle Reminders
As with any foraged herb:
Make sure you’ve correctly identified the plant before consuming.
Avoid areas that may have been sprayed or heavily contaminated.
If you’re pregnant, nursing, or on medications, it’s always wise to double-check with a trusted healthcare provider before adding new herbal teas regularly.
From “Weed” to Teacup
Watching my husband’s grandmother bend down in the driveway and start picking “weeds” for tea completely changed how I look at what grows around us.
Chamomile went from being a box on a grocery shelf to a living, growing plant that shows up in the unlikeliest places—and now, to something our family can gather, dry, and sip together.
If you’ve ever wondered whether you could forage your own tea, chamomile is a gentle, beginner-friendly place to start.
Have you ever foraged something you used to buy at the store?
If this chamomile guide gave you some ideas (or a little confidence to try foraging), would you share it with a friend or save it for later?
Somehow, May is already almost over. If you plant a garden, have you gotten yours in yet?
We’re in Zone 4B, and by late May our garden is finally in full swing. If you’re looking for ideas for your own Zone 4B vegetable garden, here’s exactly what we planted this year and why. In this post, I’m sharing what we planted in our garden this year and the order we planted it in (spoiler: it definitely did not all happen in one day). Think of this as a walk-through of our garden rows, plus a few notes on what’s working, what isn’t, and what we’re excited to try.
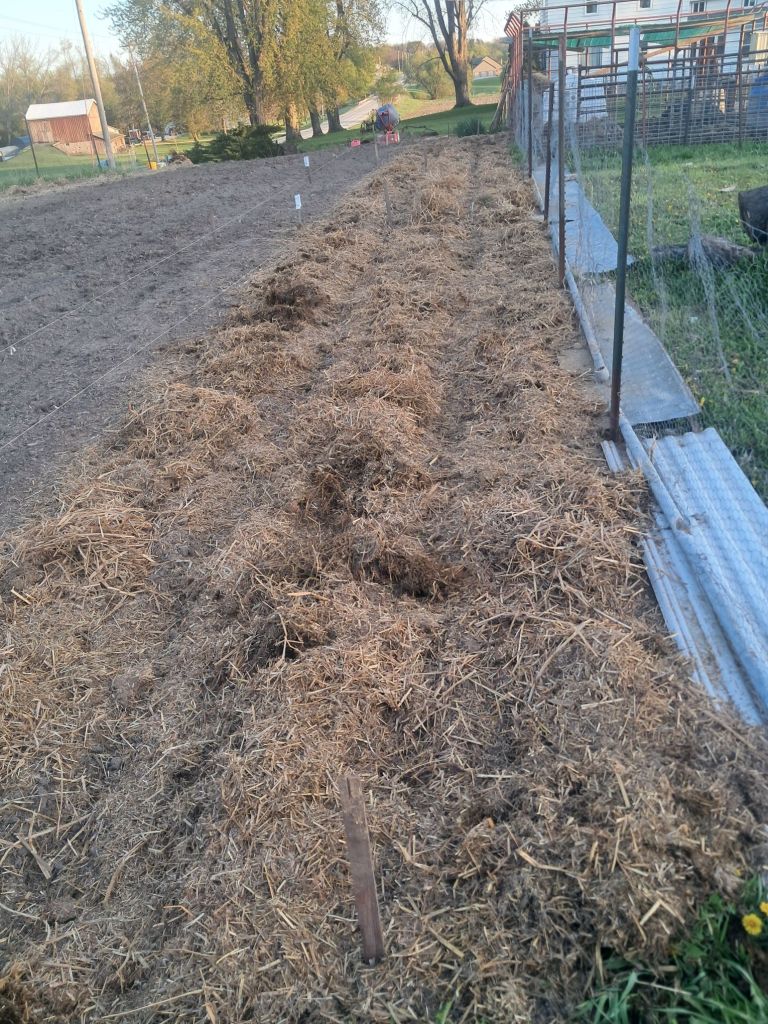
Strawberries: The Semi-Permanent Front Row
We started about a month ago by dedicating the first two rows of our garden to strawberries. This will be a semi-permanent location for them.
Here’s our basic setup:
Transplanted strawberry plants into two full rows.
Plan to layer straw on top to help suppress weeds and hold moisture in during the warm months.
I’m pinching the blossoms off all the plants for the first two months.
The blossom-pinching feels a little cruel in the moment, but it lets the plants focus on strong root and leaf growth. If all goes well, we should be enjoying delicious berries by July or August from the everbearing varieties.
Strawberries plants are hidden amongst the straw (for now)
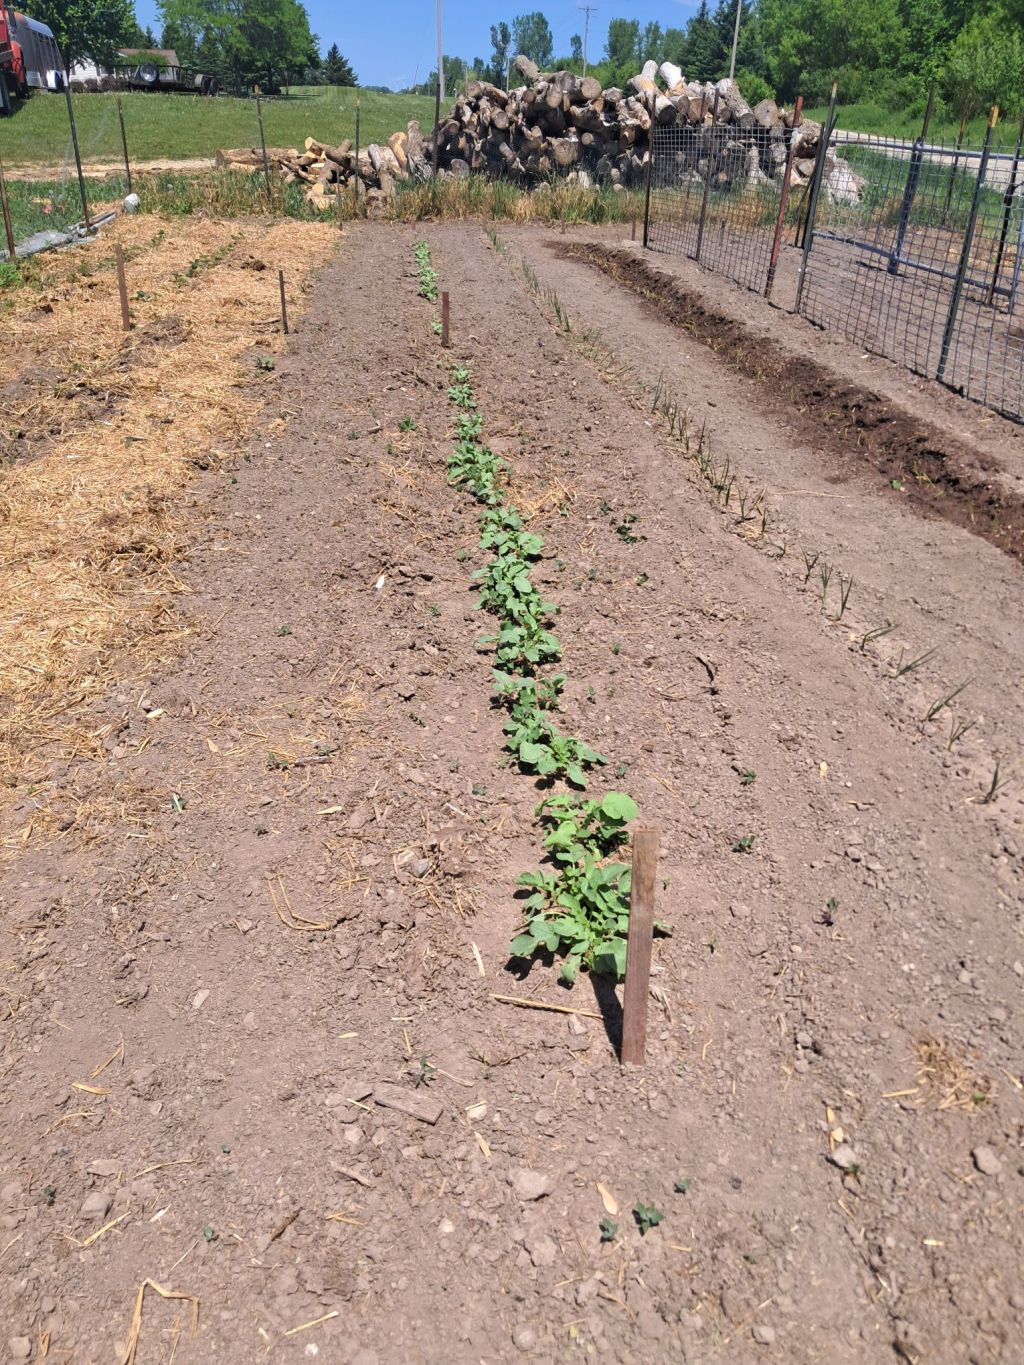
Root Vegetables: Fresh Salads Now, Storage Roots Later
Next, we planted our root vegetables and salad greens. This is one of my favorite parts of the garden because it gives both quick wins and long-term rewards. (You’ll notice I have a lot of “favorite” parts—my garden just brings me that much joy.)
In this section we planted:
Parsnips – for fresh roots next March and April.
Radishes – for quick crunch and color in early salads.
Lettuce and spinach – fast growers, so we can enjoy fresh greens in just a couple weeks.
Carrots – for fresh eating in the next couple months and for later winter storage.
Beets – for roasting, pickling, and everything in between.
I plan to share in a future post how we keep garden-fresh carrots through the Wisconsin winter, and also how we turn all of these roots and greens into actual meals (rather than just “good intentions” in the crisper drawer).
Radishes, we just harvested our first bunch last night!
Onions: The Powerhouse Vegetable (and a Confession)
After the root bed came two full rows of onions—both red and yellow.
I prefer transplanting onion plants rather than using onion sets. That was the plan this year too…in theory.
Between poor starting soil, my “casual” watering habits, and not trimming the tops, my onion starts never made it to the garden.
Instead, my dad kindly shared some surplus onion plants he purchased from the Amish, and they became our onion rows.
Don’t judge me too harshly for the crooked row. I was planting with a toddler in tow…
Why we love onions:
They’re a true powerhouse vegetable in the kitchen.
They store well when kept under the right conditions.
Even in our less-than-perfect storage setup, I pulled my last onion from last year’s harvest about a month and a half ago.
We plant:
Red onions for fresh eating and pickling (they’re fantastic pickled).
Yellow onions for long-term storage and everyday cooking.
Peas: Kid-Favorite Garden Candy
Next up: peas.
Peas are one of our family’s favorite vegetables to eat right in the garden. The kids love:
Picking them straight off the vine.
Popping the pods open.
Eating the peas fresh, still warm from the sun.
They disappear almost as soon as they ripen.
We installed a trellis right away, but “trellis” might be a generous term. In true homestead fashion, we used:
An old corn crib side as the main panel.
Old fence posts to hold it in place.
We love recycling old farm implements wherever possible—it saves money, reduces waste, and gives these materials a second life.
Somewhere in the sky, an old farmer is smiling down on our resourcefulness (I hope)
Cucumbers in the Middle (On Purpose) + Tomatoes and Peppers
Next came cucumbers.
Some gardeners might be clutching their pearls at this, but yes: we plant our cucumber patch in the middle of the garden.
The reason we can get away with this is our trellis. Instead of letting the vines sprawl everywhere, we:
Use an old cattle panel as a trellis.
Hold it in place with old fence posts.
This keeps the vines mostly vertical and contained, which makes it easier to walk around the garden and keeps the cucumbers cleaner and easier to harvest. It might not be traditional, but it works for us.
Once the cucumbers were in, we filled the rest of that row with transplanted veggies:
Peppers (both bell and hot).
Tomatoes – a mix of early-ripening varieties, Romas (for sauce), and Mortgage Lifters (for big slicing tomatoes).
Peppers galore!
Cruciferous Row: Cauliflower, Kale, Broccoli, and Brussels Sprouts
The next row is devoted to some of my favorite vegetables: cauliflower, kale, broccoli, and Brussels sprouts.
I love cruciferous veggies for a few reasons:
They’re incredibly versatile in the kitchen.
They freeze beautifully, which makes them a big part of how we keep eating vegetables all winter without visiting the grocery aisle.
They’re hardy and forgiving once established.
In a future post, I hope to share exactly how we prep and freeze these so they stay tasty and usable.
Quick kale note: I may be late to the party, but I also love kale soup. I’m still not sold on kale chips—mine tend to swing between soggy and burnt—but I’m open to conversion if someone can show me the magic method. Shoutout to my friend who shared her Zuppa Toscana (and the recipe!) and officially turned me into a kale-soup person.
Cabbage, More Cauliflower, Bok Choy, and Kohlrabi
The next row is a mix of:
Cabbage – destined for sauerkraut.
More cauliflower – because we’re not sure how well the older seed in the other row will germinate.
A quick note about kohlrabi: the name literally translates from German as “turnip cabbage,” describing its shape. I grew up with it, but I don’t know how many people outside German ancestry know what it is.
Why I love kohlrabi:
It grows above the ground and matures in about two months.
Around the 4th of July, it’s usually ready, and it’s one of my favorite veggies to snack on then.
It’s delicious raw—peeled and sliced.
The flavor is like a cross between a mild radish and broccoli.
I’ve experimented with cooking it, but honestly, we usually eat it raw before I get a chance to cook or roast it. I’ve also pickled it with great success.
If you’ve never tried kohlrabi and you love cruciferous veggies, I’d highly recommend grabbing some seed and giving it a spot in your garden.
Summer Squash and Rutabagas
In the back corner of the garden, we planted summer squash—three hills of it.
In my unsolicited opinion, three hills is about two hills too many. If you’ve ever been buried in zucchini or summer squash, you know exactly what I mean.
The rest of that row holds garlic and rutabagas.
The garlic was planted way too late last October, and it shows; it didn’t come up well.
To make better use of the space, we interplanted rutabagas.
Rutabagas are another veggie I’ve only recently fallen for. They make a great “potato” replacement in mid-summer and are wonderful:
Sautéed.
Roasted.
In pot pies.
Sweet Corn and Cantaloupe at the Front
The front of the garden holds our sweet corn patch.
Full honesty: I have not had the best luck with sweet corn in recent years. The local raccoons and possums seem to love it even more than we do. We’ll see how it goes this year.
On the other side, we planted cantaloupe. In my experience (Zone 4B), you don’t need to transplant cantaloupe:
When you plant seed directly into soil that’s warm enough (late May here), it catches up quickly.
Direct-seeding saves time and space in the seed-starting area.
If you’re curious about how we store carrots, freeze broccoli and cauliflower, or use bok choy in dumplings, those posts are coming (or, in the case of Chinese dumplings, are already here).
Potatoes, Pumpkins, and Future Plans
Beyond the main garden rows, we have two additional patches:
My husband planted a patch of potatoes using a restored potato planter, which was a fun bit of old-meets-new on the homestead.
Behind our barn, we plan to establish a pumpkin patch.
I’m already dreaming of fall pumpkins, roasted seeds, and maybe even some homegrown pumpkin purée for baking.
That’s our lineup for this year’s Zone 4B garden, from strawberries in front to pumpkins out back.
What’s growing in your garden this year, and which veggie are you most excited to harvest first?
If this little garden tour gave you some ideas (or just made you feel less behind on planting), would you share it with a fellow gardener or save it for later?
You can also join my email list for more honest, Zone 4B garden updates, planting ideas, and what’s actually working for us from season to season.
The process of purchasing meat directly from a farmer is a little different than grabbing a package from the grocery store. It takes more planning, dependable freezer space, and a willingness to think about your food in a new way.
But in return, you get so much more than just meat.
If you’ve ever wondered how to buy a quarter beef or half pig from a local farmer, this guide walks you through the whole process.
Knowing How Your Meat Was Raised
There’s something powerful about being able to visit the animal that will eventually feed your family.
When you have a good relationship with a farmer, you can:
See where the animals live
Watch what they eat
Notice how they’re handled and treated
To be a good farmer is to be empathetic. You’re working with living beings that deserve dignity. They don’t deserve to live in filth, inside all the time, never able to root, scratch, or roam according to their instincts.
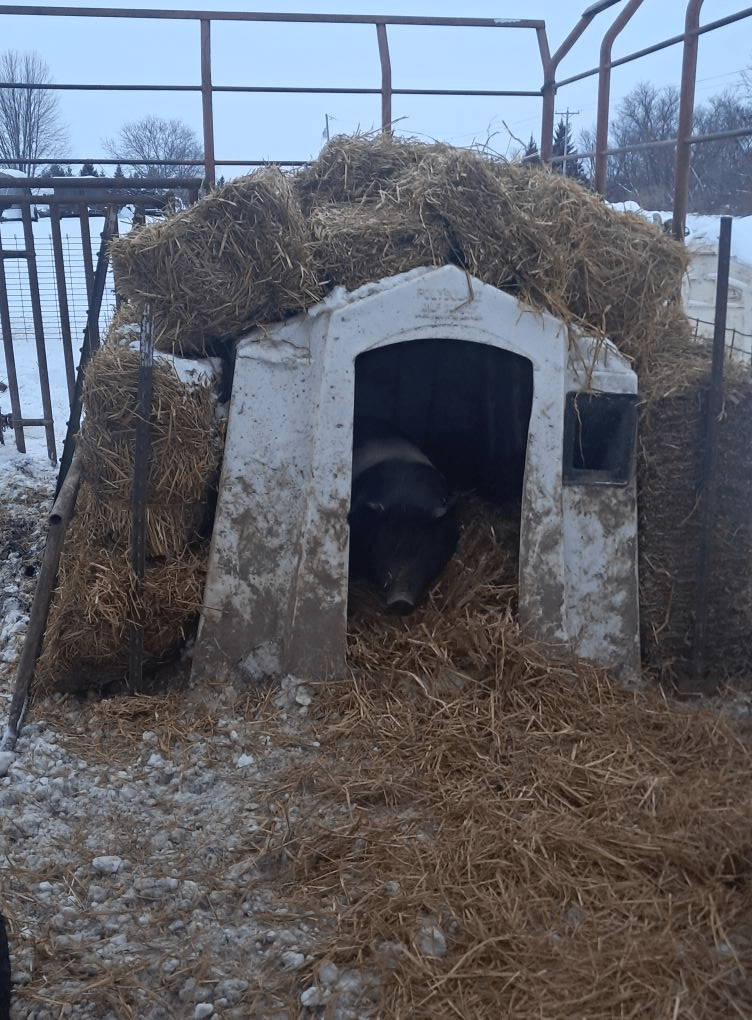
On our homestead, for example, our pigs are raised outside all the time. They can root, eat grass, make mud puddles, and scratch. We don’t dock piglets’ tails because we let them nurse from mom long enough that they don’t get frustrated and chew on each other. In winter, we help them stay warm in a few ways: we feed them extra so they can build up fat reserves, and we add plenty of straw and insulation around their pig hut (which, for us, is an old calf crate). Think of it like the house of straw from the three little pigs—but this one is reinforced with solid supports and a lot more intention.
Little Pig, Little Pig, Let me in!
When you buy meat from a farmer whose practices you know and trust, you’re not just buying a product. You’re choosing a story you feel good feeding your family.
Bulk Meat, Full Freezer, and Creative Cooking
Buying meat in bulk pushes you to think beyond just bacon, sausage, and ham.
Pigs, for example, are so much more than the “usual” cuts. Have you ever had:
A well-cooked pork steak or pork chops
Homemade uncased breakfast or Italian sausage (not at all difficult to make)
Marinated side pork (uncured bacon) cooked over a grill or campfire (this one is a total game changer)
There’s a whole world of flavor and texture in a single animal, and learning to cook those different cuts can actually be fun. I plan to share more recipes and cooking ideas in future posts if you’re interested in exploring beyond the basics.
There’s also the very practical side: having a full freezer of meat means:
Fewer last-minute grocery runs
Less impulse spending on convenience food
One less thing to juggle when life is busy
With a little forward planning, you’re essentially building your own little “store” at home that you can shop from all year. When you’re tired, sick, or snowed in, knowing you have meat on hand for soups, roasts, tacos, casseroles, and quick meals is a huge relief.
Helps a neighbor maintain their land, care for animals, and keep going another season
Ideally, this relationship grows beyond a simple transaction. Over time, you get to know each other. You learn their rhythms and challenges; they learn about your family and your needs. Maybe they text you pictures of new piglets, or you bring your kids out to see the calves.
You’re not just “a customer”—you’re part of the farm’s story too.
In other words, you’re trading a little extra planning upfront for better meat, deeper connection, and a more secure pantry.
How Buying Meat in Bulk from a Farmer Works
Now that we’ve talked through the benefits, let’s look at how this actually works in practice.
When you purchase meat directly from a farmer, you typically buy a portion of an animal, not just an individual package. You’ll usually be offered:
A quarter
A half
A whole
The exact options depend on the type of animal and the farmer.
Buying a Quarter or Half Beef
A beef animal (steer) is large, so it’s commonly broken into quarters.
One quarter of beef usually equals around 200 pounds of freezer meat (this can vary based on size and breed).
A half or whole animal would, of course, be proportionally more.
This sounds like a lot—and it is—but once you break it down into ground beef, roasts, steaks, stew meat, and soup bones, most families are surprised how quickly they use it over the course of a year. For many four-person families, a quarter beef can comfortably supply most of their beef for many months, if not close to a full year, depending on their eating habits.
You’ll sometimes hear people call this a “quarter cow,” but “quarter beef” is the more accurate term.
Buying a Half or Whole Pig
Pigs are smaller, so they’re often sold as halves or wholes.
A half pig usually yields around 100 pounds of freezer meat.
A whole pig is roughly 200 pounds, give or take.
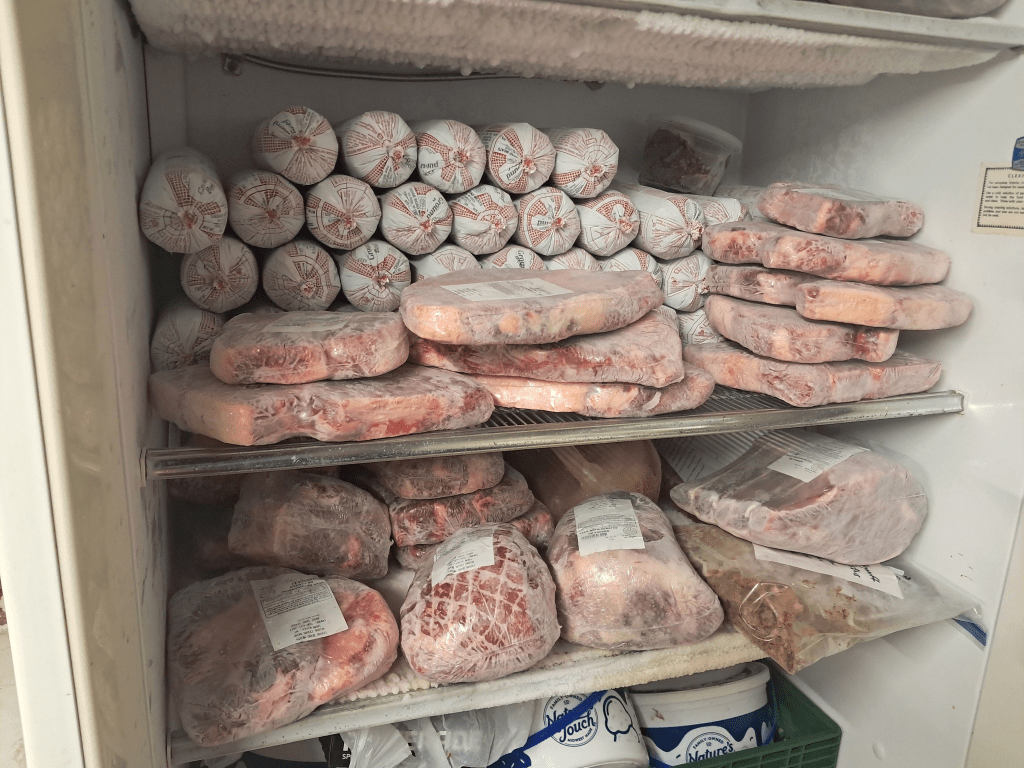
The 2 boxes on the right show what a half pork looks like, labeled and packaged. The rest is my Amish suppies.
The pork is split between bacon, ham, ground pork or sausage, and various cuts. For our four-person family, a whole hog is enough pork to last us about one year. Your experience may vary based on your family’s eating habits.
Again, these are ballpark numbers, but they’re helpful for planning. You can always split a half or a whole with another family if that feels more manageable.
Freezer Space for Bulk Meat Orders
Buying a quarter of beef or a half pig means one very practical thing: you need somewhere to store it.
A few things to consider:
Freezer Type
We use both a chest freezer and an upright freezer between our beef, pork, frozen garden vegetables, and other grocery store finds (yes, I do still grocery shop, but more like monthly). Either style works; it often comes down to space and personal preference.
Chest freezers tend to be more energy-efficient and stay cold longer if the power goes out.
Upright freezers are easier to organize and access because everything isn’t stacked on top of everything else.
Our chest freezer full of frozen beef (this is what a quarter beef looks like).
Finding a Freezer
You can often find secondhand freezers at a bargain on places like Facebook Marketplace or local buy/sell groups if you’re willing to watch for deals and clean them. Just make sure you can test that it gets and stays cold before you bring it home.
Electric Considerations
Ideally, your freezer should be on a dedicated electrical circuit to reduce the risk of tripping a breaker and silently losing everything. If you’re unsure, it’s worth asking someone handy or an electrician to check.
Power Outages
If there is a power outage, resist the urge to open the freezer “just to check.” A closed, full freezer will stay cold much longer than you’d think. If your area loses power frequently, having a small generator on hand for your freezer might be worth considering.
Think of your freezer as a savings account: that meat is your hard-earned money in frozen form. You want to protect it.
Planning Ahead with Your Farmer
Farmers can’t just create finished animals overnight. It takes time to raise them to a good butcher weight, and many farms book processing dates months in advance.
As a rough guide:
A beef animal takes about 2 years to raise.
A pig takes about 6 months.
Most farmers plan their processing schedule well ahead of time. If you’re thinking of buying meat in bulk:
Reach out to a farmer several months (or even a season) in advance.
Ask when they typically send animals to the processor.
Get on their list early, especially if they’re a smaller operation.
You can also ask about breed and feeding practices (grass-fed, grain-finished, pasture-raised), so you know exactly what you’re getting.
Building a Relationship While You Wait
During that time, you can do more than just wait for a phone call.
Visit the farm if that’s an option.
Ask questions about how they feed and house animals.
Let your kids (if you have them) see where their food comes from and ask their own questions.
Every farmer I know—and I know quite a few, thanks to my agricultural background—loves to talk about their animals. They’ll tell you about personalities, quirks, and challenges. For most of them, farming is a vocation, not just a job. They’re in it because they care.
Understanding the Two Bills: Animal and Processing
When the processing date gets closer, your farmer will reach out with more details, such as:
Which butcher/processing facility they’re using
The approximate hanging weight of the animal, and the price per pound for their part
The approximate date you can expect to pick up your meat
This is also when you’ll want to understand how payment works. When you purchase directly from a farmer, you’re usually paying two separate bills:
The animal itself – paid directly to the farmer
The processing/butchering – paid directly to the butcher or processing facility
The farmer can tell you their rate structure (per pound, flat rate, etc.), and the processor will have their own fee schedule based on your preferences—cutting, wrapping, curing, sausage-making, smoking, and so on.
Working with the Butcher on Cut Choices
Once the farmer takes the animal to the butcher shop, their part in the story is essentially done. Next, the butcher shop (to whom the farmer has passed along your contact information) will reach out with questions about how you want your meat processed.
A good butcher will walk even the least experienced person through the process. Some examples of decisions include:
More roasts or more ground?
How thick do you want steaks or chops cut?
What kinds of sausage would you like, and in what size packages?
Do you want soup bones, organ meats, or extras like lard or fat?
The possibilities are truly endless, and you can customize it in the way that works best for your cooking. One year, you might prefer 1‑pound packages of ground beef or pork; the next year, you might decide you’d rather have 1.5‑pound packages to better fit your favorite recipes. You can adjust as you learn what your family actually uses.
Picking Up Your Bulk Meat Order
The last part is picking up your meat from the butcher.
The processor will contact you when everything is cut, wrapped, and frozen, and they’ll share the total cost due to them.
It’s important to ask whether you need to bring coolers or boxes to store the meat on the way home. Some butchers provide boxes; others do not.
There’s nothing worse than showing up unprepared and having 200 pounds of meat rolling around loose in your vehicle. Don’t ask me how I know.
A few final tips:
Bring sturdy boxes or coolers so you can stack and carry the meat easily.
Bring a pair of gloves—the meat is cold and pre-frozen, and you don’t want frozen fingers by the time you’re done loading and unloading.
Make sure you have your freezer space ready and cleared before pickup day, so you’re not rearranging everything with a car full of thawing meat.
It can feel more complicated than grabbing a package at the store, but once you’ve done it, it starts to make sense. And the reward is a freezer full of meat you feel good about, with a story you actually know—and a farmer you can call by name.
Common Questions About Buying Meat from a Farmer
Is it cheaper than grocery store meat?
It depends on what you’re comparing it to.
If you usually buy the cheapest grocery store meat and the bargain cuts, buying from a farmer may cost a bit more per pound.
If you usually buy higher-quality or “natural” meat, buying in bulk from a farmer is often the same price or cheaper—and you’re getting better quality and supporting a local family.
One important consideration is that you pay one price per pound of processed meat. This includes the more expensive cuts like pork belly or tenderloin, and the “lesser” cuts like spare ribs and pork hocks. The more expensive cuts come down in price compared to the grocery store, and the “lesser” cuts are typically at or slightly higher than grocery store prices.
The biggest difference is that you’re paying for a large amount at once instead of spreading it out over many small trips—and all the tempting last-minute impulse purchases grocery stores are so good at encouraging.
Do I have to take cuts I don’t know how to cook?
No—and also, not forever.
You can customize your order a lot. For example, if you don’t like roasts, you can ask for more ground.
You can skip certain things (like organ meats) if you know you won’t use them.
Over time, you might decide to try one or two “new” cuts each year as your confidence grows.
You’re not locked into one way of cutting forever; you can adjust each time you order.
What if I don’t have enough freezer space for a whole or half animal?
You have options:
Split a quarter or half with a friend or family member.
Ask your farmer if they know anyone looking to “share” an animal—many do.
Start smaller (for example, a quarter beef instead of a half, or half a pig instead of a whole).
You don’t have to jump straight into a full animal on your first try.You have options:
Split a quarter or half with a friend or family member.
Ask your farmer if they know anyone looking to “share” an animal—many do.
Start smaller (for example, a quarter beef instead of a half, or half a pig instead of a whole).
You don’t have to jump straight into a full animal on your first try.
How long will the meat last in the freezer?
If it’s wrapped well and kept consistently frozen:
Most cuts are best within 12–18 months, though many will last longer and still be safe to eat.
Ground meat is typically best within 6–12 months for peak quality.
Labeling packages with the date and type of cut makes it much easier to rotate and use things in a good timeframe. A good butcher will do that for you.
What if I’m nervous about making the wrong choices?
You’re not alone—almost everyone feels that way the first time.
A few reassurances:
Farmers and butchers are used to first-timers. They expect questions.
A good butcher will walk you through the options and explain what’s common for families like yours.
You can keep things simple your first time (basic steaks/chops, roasts, and ground), then get more adventurous with sausage, specialty cuts, and smoking on your next order.
Think of your first bulk order as a learning experience. You’ll quickly figure out what your family uses most.
If You’re Local and Want to Buy from Us
If you’re local (Southeastern Wisconsin) and interested in buying pork from our homestead, we’d love to connect.
Because raising and processing animals is a big investment, we use a simple reservation and deposit system so everyone knows what to expect:
You reserve a portion (half or whole) with a small non-refundable deposit.
We raise and deliver the animal to the butcher on the scheduled date.
Once we know the hanging weight and processing cost, we send you a clear invoice.
After payment, you pick up your meat at the butcher.
If that sounds like something you’d like to explore—or if you just have questions—feel free to reach out. We’re happy to talk through the process and see whether it’s a good fit for your family.
Have you ever bought a quarter beef, half pig, or other bulk meat from a farmer—or is it something you’ve been curious (or nervous) to try?
If this helped answer some questions—or made buying meat from a farmer feel a little less intimidating—please like and share it with a friend who’s been talking about “finding a local farmer.” It makes a bigger difference than you think.
This spring on our homestead has been both chaotic and full of life. Between new animals, fresh plantings, and long-awaited property upgrades, it feels like everything is waking up at once. If you’re curious what real-life spring homestead projects look like for us—or looking for ideas for your own place—here’s what we’ve been up to.
Spring Planting: Fruit Trees, Strawberries, and Garden Beds
This spring, we’ve focused heavily on long-term food production. We planted new fruit trees, added strawberries, and finally started planting the garden.
Fruit Trees
We put in three apple trees to start planning ahead for the day when our older orchard slows down. Our established apple trees are slowly starting to die off, so these new trees are our way of making sure future us still has apples to harvest. In addition, we’ve planted two pear trees (because my 6-year-old son absolutely loves pears, and we love them too). All the fruit trees should start producing a small amount of fruit in about three years, with bigger harvests in the years after that. The kids are already talking about how they “can’t wait” to pick our own apples and pears someday.
Strawberries
We also planted 75 strawberry plants in three different varieties. About two-thirds are everbearing strawberries, which produce fruit throughout the growing season. The remaining third are June-bearing strawberries, the kind that give you that big flush of berries in June—what most people know from U-pick strawberry farms.
Hard to see, but the strawberries are there!
We’ll pinch the blossoms off the everbearing strawberries for the first couple of months while their root systems establish, then we’ll start letting them fruit. For the June-bearing strawberries, we’ll pinch all the blossoms this year so they can focus on roots, and we should start seeing fruit next summer. The kids are already excited, asking when they’ll get to pick strawberries and dreaming aloud about “strawberry snacks” straight from the garden.
Field and Garden
Out in the field, my husband planted our two-acre plot of oats, then tilled up a 120-foot by 30-foot field behind our barn (I know, cute) where we planted high population corn (planted more closely than typical field corn). These crops are intended to become feed for our pigs, chickens, and turkeys, which feels like a big step toward growing more of our own animal feed.
Once the April flooding finally receded, we started planting the main garden. So far we’ve gotten radishes (the perfect cool-weather crop), rutabagas, parsnips, and transplanted onions in the ground. There’s still plenty more to do, but it feels good to see those first rows planted.
Don’t judge my not-too-straight row of onions too harshly please!
Spring Animal Projects: Piglets, Chicks, and Turkeys
Anyone with animals knows that adding more livestock takes planning, patience, and a little bit of risk.
Piglets
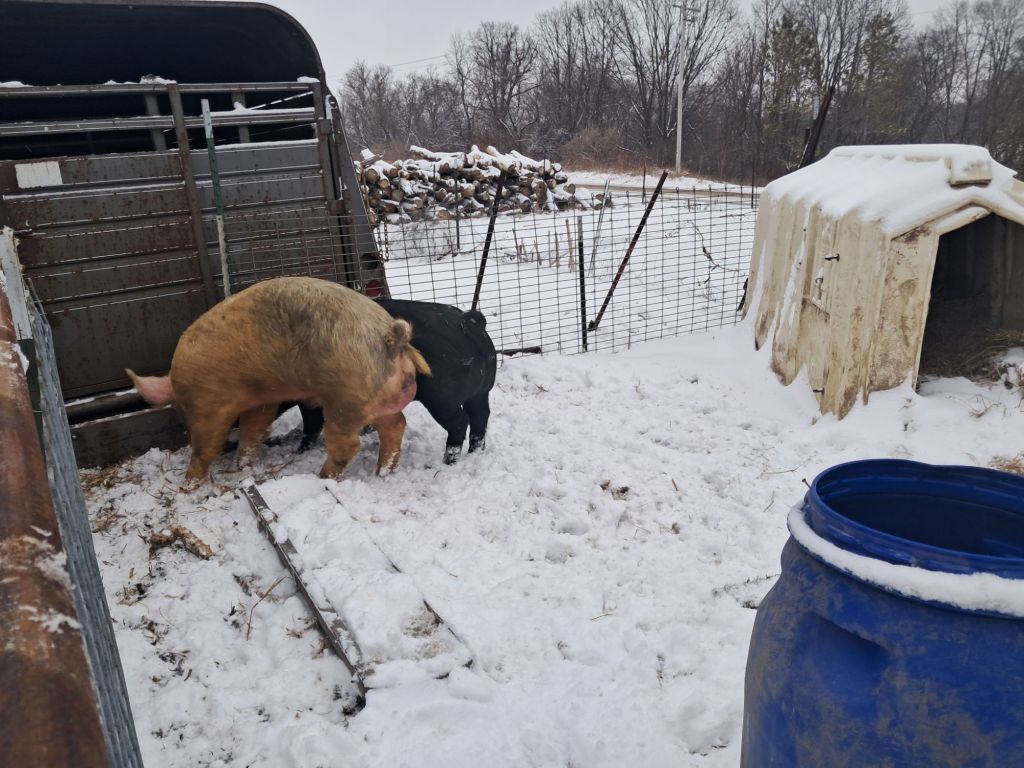
Last year, we added two gilts to our pig herd and decided—almost on a whim—that we wanted to try farrowing piglets. Of course, biology says you can’t have piglets without a boar, so my brother-in-law graciously lent us his boar for two weeks in mid-January. In return, we helped him by cutting down a tree. Homestead barter at its finest.
Mr. Eligible Bachelor (pink) as he wooed his lady.
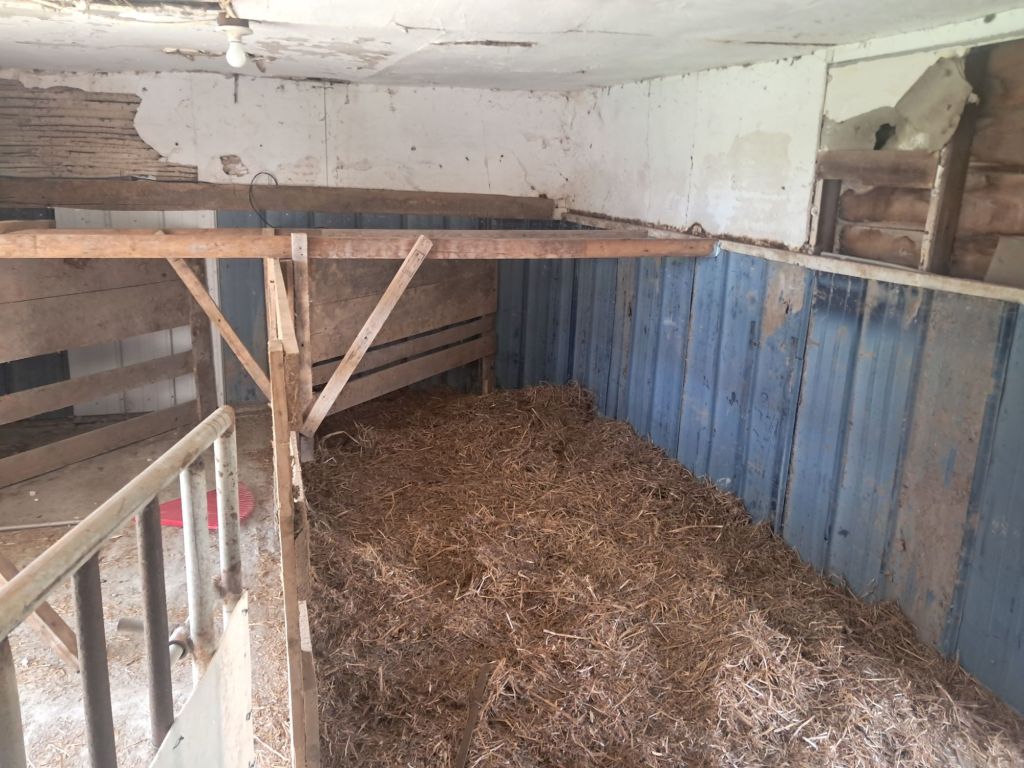
Next, we needed a safe space for piglets to be born and grow for the first several weeks. My husband converted an old dilapidated shed into functional farrowing quarters. He shored up rotten sections, set used silo staves in cement to make a makeshift floor, and built a farrowing crate from reclaimed wood. He even added lights, knowing we’d be checking on her at all hours until she finally gave birth.
All ready for some babies!
So far, one gilt has farrowed 10 piglets, and the second is due any day. We love having little babies around the homestead—it’s noisy, busy, and pretty wonderful.
Our plan is to either sell some of the piglets as feeder pigs or raise them for pork that’s grown outside on pasture. If you’re local (SE WI) and interested in either, feel free to reach out.
Chicks
About a month ago, we also added to our poultry flock. We purchased 15 straight-run Wyandotte chicks and set them up in our basement. At the same time, I set up my incubator with 22 eggs.
My first attempt at incubating eggs was a complete failure—I didn’t hatch a single chick from 47 eggs. Lesson learned: the orientation of the eggs in the incubator matters. They can’t be placed upright in egg cartons; they need to lie horizontally or they simply won’t develop.
This time, with the eggs properly positioned, 10 chicks hatched and 9 survived. That gives us 24 new chicks total. In theory, about half will be roosters and half hens. We plan to keep one rooster as our new stud, and the rest of the roosters will eventually head to “freezer camp” and become shredded chicken for soups, broth, and casseroles (yes, I’m from Wisconsin, and we call it casserole). The kids love checking on the chicks in the brooder, counting them, and reporting back on who’s sleeping, who’s eating, and which one is “their” favorite.
Turkeys
Our turkeys have their own spring plans. Both turkey hens found separate hidden spots around the property to sit on nests—despite the small detail that there are no toms currently on the homestead. My husband decided to do a little switcheroo and swapped one turkey’s eggs for fertile chicken eggs. We’ll see if any of those end up hatching. There’s never a dull moment with birds.
Property Improvements: Upstairs Progress and Cleanup
Spring hasn’t been all about plants and animals; we’ve made progress on the house and property, too.
Upstairs Progress
For those who don’t know, we bought our house in 2023 with an unfinished upstairs. Earlier this month, carpet was finally installed in most of that space, and now we’re down to finishing touches like closet doors and furniture. The last third of the upstairs still needs to be completed, and we’re planning to add a bathroom upstairs so we don’t have to navigate steep stairs in the middle of the night.
Outside Cleanup
Outside, my husband has been on a mission to clean up the property again, hauling away loads of scrap metal. The plan for this summer is to shore up one of the existing buildings so we can use it as temporary cover for our equipment while we demolish old structures and replace them with something more functional.
It’s a lot—but it’s the good kind of work.
Spring on a homestead is always busy, but seeing these projects come together—fruit trees in the ground, piglets in the barn, chicks in the brooder, and an upstairs that finally feels like it’s becoming livable—makes all the mud, mess, and chaos feel worth it.
It’s one more season of growing food, raising kids alongside all this work, and slowly building the kind of place we want to call home.
What spring projects are you working on around your home or homestead right now—plants, animals, or house upgrades?
If this gave you ideas—or just made you feel less alone in the spring chaos—tap like and share it with a friend who’s also growing, raising, or rebuilding something this season.
This is a shorter post this week, but it feels like a big one.
We have piglets.
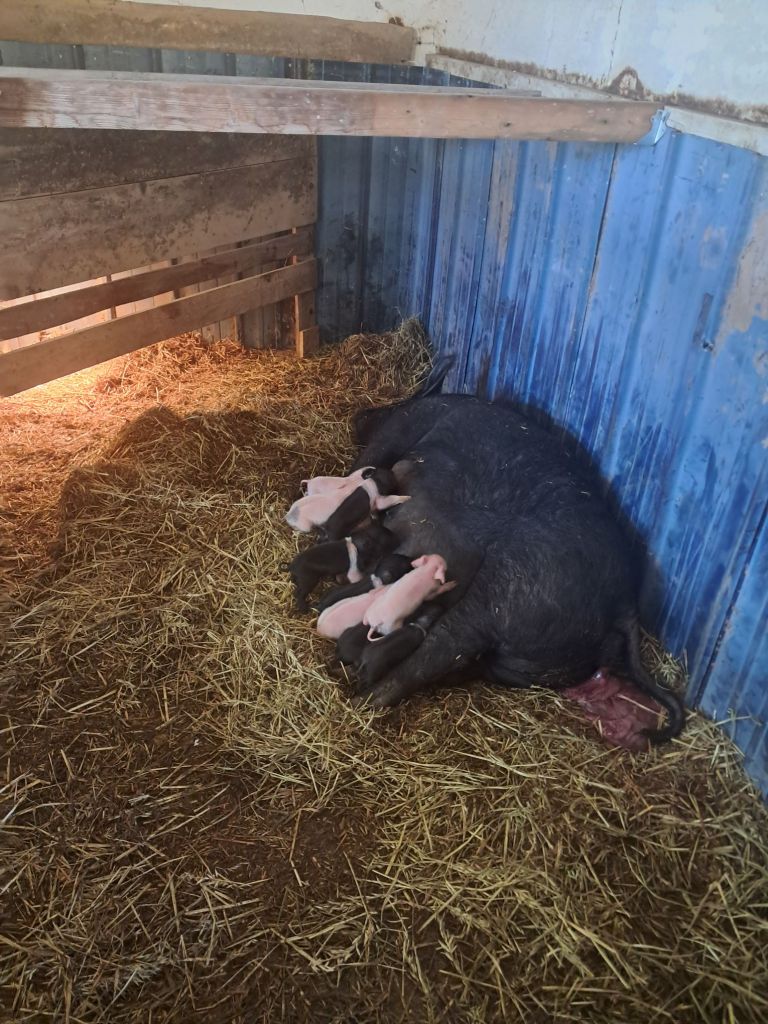
On Monday afternoon, our first gilt farrowed 10 piglets (and one stillborn), and it was our first time experiencing pig farrowing firsthand. One minute we were checking on her like we had so many times before, and the next we were in the middle of something real and messy and alive. There’s no easing into it when it starts—you go from waiting to catching babies in what feels like a breath.
At one point, the farrowing process stalled, which raised our anxiety pretty quickly. From what we’ve learned, pauses can happen during farrowing, but in the moment it’s hard to know when to wait and when to step in. We hovered, second-guessed ourselves, and tried to stay calm. In the end, she worked through it on her own, which was both a relief and a reminder that animals often know exactly what to do if we give them space.
Once the piglets were here, things shifted into action mode. We cleaned them off, making sure each one was breathing well and able to stay warm. My brother-in-law walked us through administering oxytocin so she could relax and start nursing. Watching those piglets root and latch felt like a turning point—less “are we going to be okay?” and more “okay, this is working.”
Momma and babies as they attached for the first time.
We stayed with her for the first couple of hours, keeping a close eye out so no piglets were accidentally crushed. One thing we learned quickly is how important it is to watch the sow’s movements closely, especially when she shifts or lays down. It’s a strange balance of awe and vigilance. Every small movement feels important. Every squeal makes you look twice—and resist the urge to intervene to prevent piglet crushing.
This is the part of raising animals, and growing food, that doesn’t always make it into the highlight reel. It’s messy, a little nerve-wracking, and very real. But it’s also where the learning happens: in the doing, in the watching, and in showing up before you feel fully ready.
And maybe that’s the overlap I keep noticing lately—between raising animals and raising kids. You prepare as much as you can, gather advice, set things up the “right” way… and then you step back and let life unfold, staying close enough to help but far enough away to let growth happen.
Right now, the piglets are tucked in close to momma, and we’re checking on them more often than we probably need to. It feels a little like bringing home a newborn again—equal parts wonder, worry, and watching something new take its first steps in the world.
Growing food, raising kids, building community… sometimes all three show up at once, in a farrowing pen on a Monday afternoon.
Have you ever been present for an animal birth on your farm? What surprised you most?
If this little farrowing story made you smile (or taught you something), please like and share with fellow homesteaders!
About every two months, I make the hour-long trip to the nearest Amish settlement to stock up on bulk groceries. It’s a steady rhythm in our homesteading life—bringing home 50-pound bags of bread flour, dried vegetables, bulk pasta, and active dry yeast that stock our pantry and turn into loaves of bread, tortillas, and buns in the weeks that follow.
But if you ask my kids, the highlight of every trip is the same: the Amish bakery.
On this particular Saturday, it seemed like everyone else had the same idea. The parking lot was full, and the line stretched halfway across the gravel lot. For a moment, I considered turning around—but one look at my 6-year-old son and 2-year-old daughter made it clear we were staying.
So, we settled in.
There was a chill in the wind, but standing in the sun made it feel like a perfect spring day. Nearby, a little Amish boy—maybe three—chased a chicken across the yard, getting just close enough each time to keep trying.
We started with a round of “I Spy,” which didn’t last long. Soon, we were watching horses in the pasture, sheep grazing in the distance, and pigeons circling overhead—much to my daughter’s delight, who confidently called them all “ducks.”
As the line slowly moved, the wait began to shift. What felt long at first softened into something slower and more enjoyable. People started talking. A couple behind us—one from Sun Prairie, another from Watertown—struck up an easy conversation about travel, baking, and everyday life.
The line as I got closer to the entrance. The smell of freshly baked bread and pastries was intoxicating.
Meanwhile, my kids wandered off and found a little girl to play with, disappearing into their own world for nearly twenty minutes.
My kids found a little girl to play with while I waited in line.
By the time we reached the door, the smell of the Amish bakery had already found us—warm bread, sweet glaze, and something deeply comforting. Inside, shelves were lined with cakes, pies, and fresh-baked goods, but there was no question what we came for.
We walked out with warm donuts in hand—chocolate for my daughter and me, glazed for my son—and barely said a word as we ate them back at the car.
Somehow, the hour-long wait didn’t feel long at all.
Trips like this are never just about bulk groceries or even the Amish bakery itself. They’re about filling a pantry that feeds our family, giving our kids space to grow and learn patience, and finding small moments of connection with people we might not otherwise meet.
It’s growing food, raising kids, and building community—sometimes in the most unexpected places.
And yes… the donuts help, too.
Have you ever stuck out a long wait and realized it was actually the best part of the day?
If you’re trying to slow down, raise your kids a little differently, or build a more intentional life—like and share this with someone on that path too.